2024开源之夏(OSPP)全流程攻略
本文最后更新于 2024-12-30,文章内容可能已经过时。
该文章主要包括两部分:
1.对OSPP和其他开源活动的简单介绍。包括活动时间,适宜人群等。
2.2024年OSPP 与Kubernetes 进行集成增强 seata-ctl 的运维能力 这个项目的全流程介绍。
1.开源活动介绍
1.1 适合人群
想从事基础架构,云原生开发
想从事开发,但是没有开发事务线更优先级选择/学有余力
感兴趣的
1.2 活动目录
ospp:https://sso.summer-ospp.ac.cn/
最众所周知的活动,项目较多,竞争也较为激烈。
gitlink:https://www.gitlink.org.cn/glcc/2024/projects
不如ospp出名,项目较少,时间和ospp较为重叠,可以作为第二选择,(今年的还为结束)
gsoc:https://summerofcode.withgoogle.com/programs/2024/projects
https://developers.google.cn/open-source/gsoc/timeline?hl=zh-cn
与前面两者时间不同,可以加qq群了解
1.3 ospp
1.3.1 时间节点
2024
4.30 项目列表确定
6.04 报名结束
1.3.2 参与过程经验
1.3.2.1 找项目
项目确定后,登陆官网查看项目列表,寻找自己感兴趣的项目。
一般项目以偏基础架构方向的为主。根据往年的经验,c++,go语言项目较多,java项目略少而且比较内卷。
1.3.2.2 联系社区(非常重要!)
ospp上对应项目有导师的联系方式,一般为邮箱。
首先给导师发邮件说明自己做项目的意愿,进一步与社区沟通。我当时是这么说的:
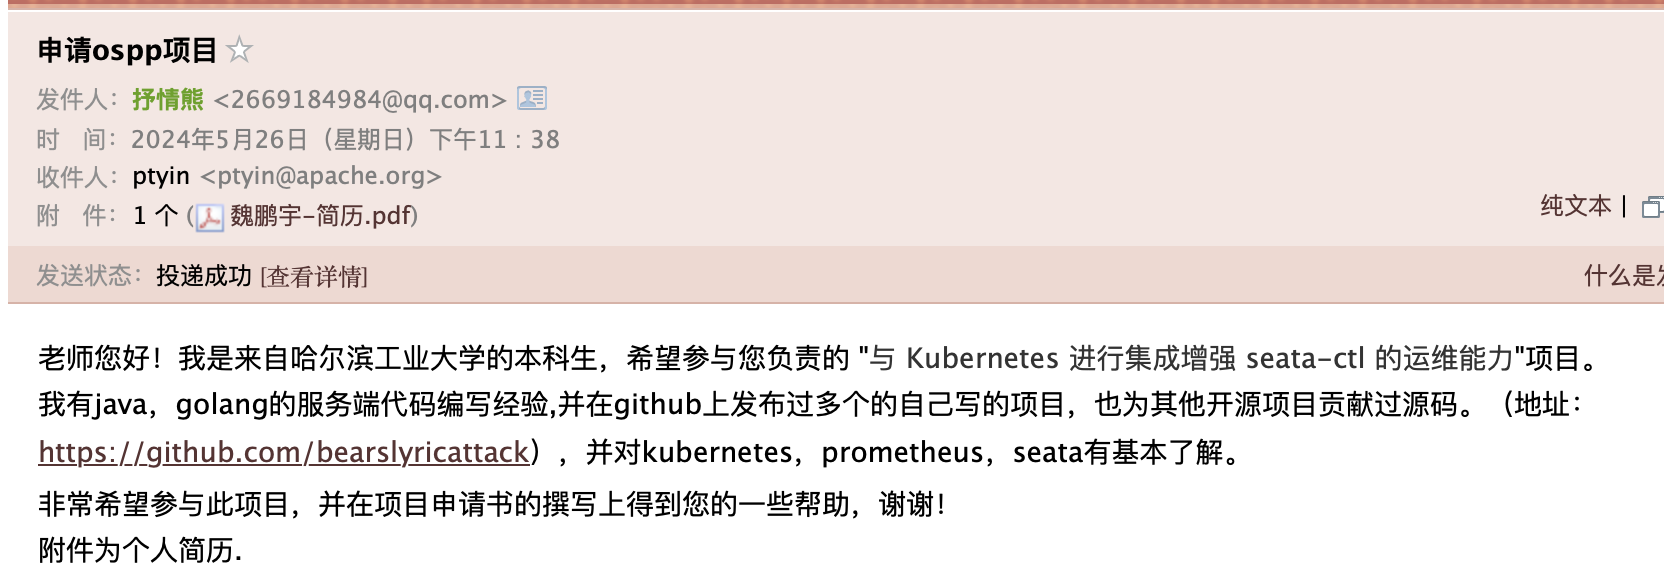
当你联系社区之后,可能会遇到各种各样的回复,可以针对不同的回复作出不同的策略,然后开始撰写项目申请书。
1.3.2.3 撰写项目申请书
主打一个随机应变。
写完之后如果有导师联系方式的话发给导师一份。记得在系统内的提交时间。
注意两点:
1.规范
2.设计性
2.seata-ctl 全流程开发
项目地址:https://github.com/bearslyricattack/incubator-seata-ctl
2.1 时间线
6月项目中选
7.6 向社区汇报方案
7.18 开始第一个提交
9.30 基本开发完成
10月份持续提交 修正代码
11月份编写报告,进行结项。
具体的提交基线可以参考下图。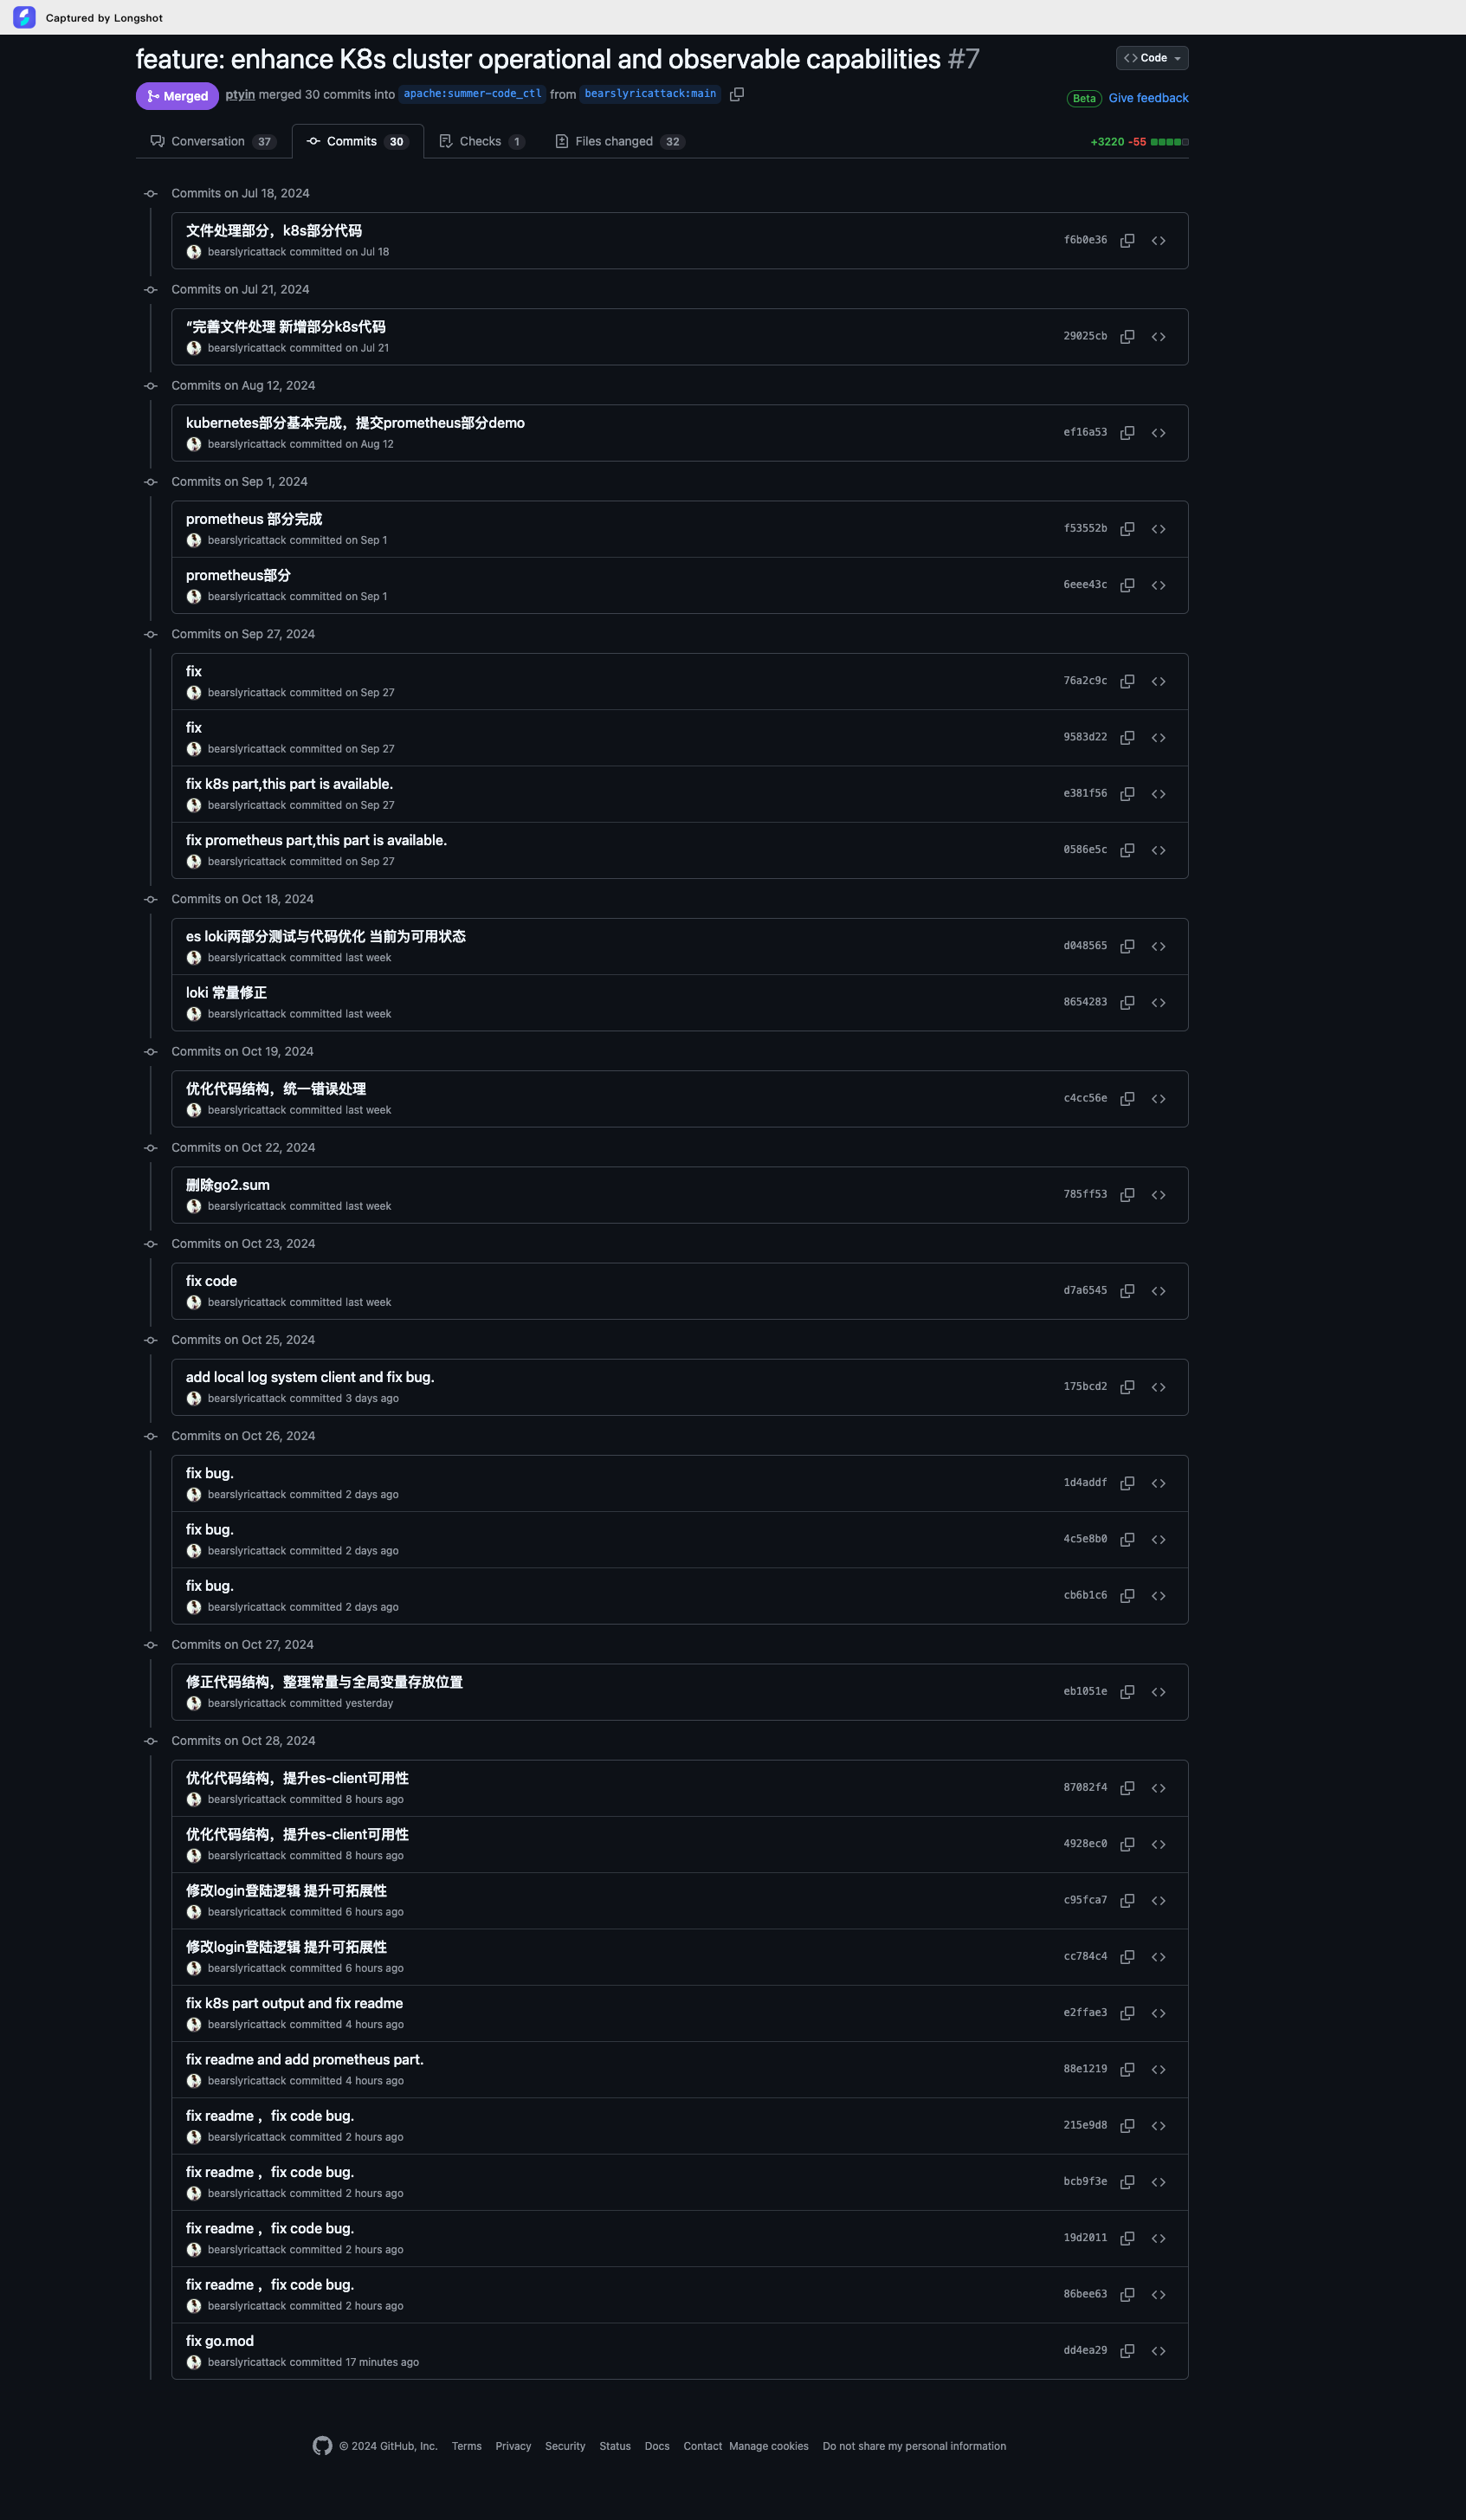
2.2 开发流程
首先进行社区汇报,面向社区的汇报文档和一开始撰写的文档类似,做小小修改即可。
2.2.1 社区汇报文档
2024.7.6进行社区汇报工作 并没有太多的问题
没有采用ppt的形式进行汇报,而是直接拿着md文档开始讲的。
1.1 SeataServer 资源的部署、扩缩容、删除等功能:
1.1.1 设计目标:
当前用户可以使用incubator-seata-k8s在k8s集群上通过yml配置的方式部署k8s集群,但是这种方式需要准备yml文件,而且不具备其他功能,实用性不太高。
本设计的目标是让用户可以通过简单的命令就可以实现部署的功能,不需要自己编写yml文件,而且可以通过简单命令实现缩扩容,删除等功能。
1.1.2 工作流程:
前置条件:一个空的kubernetes集群,一台本地开发机。
本地安装seata-ctl:
使用seata-ctl连接到集群(kubeconfig或者其他方式)
部署crd资源
部署自定义controller
执行相关命令
1.1.2.1 命令执行过程:
命令的执行本质上是使用seata-ctl访问kubernetes的api-server,来操作使用incubator-seata-k8s定义的cr,然后通过自定义的controller修改部署的状态,从而实现间接控制和运维seata集群的目的。
1.1.3 命令设计:
1.1.3.1 应用crd和部署controller:
1.1.3.1.1 命令:
seata-ctl install1.1.3.1.2 参数:
应该包含crd和自定义controller的版本信息。主要依赖于incubator-seata-k8s的版本控制,可以考虑使用镜像仓库的版本号进行控制。
该设计本质上是通过用户命令转化为yml配置文件再发送到k8s集群上部署的过程,追求的应该是命令尽可能的简单,降低用户的学习和使用成本。
1.1.3.2 部署资源:
1.1.3.2.1 命令:
seata-ctl deploy 1.1.3.2.2 参数:
incubator-seata-k8s定义的完整crd的yml文件在https://github.com/apache/incubatorseatak8s/blob/master/config/crd/bases/operator.seata.apache.org_seataservers.yaml可以找到,重要的配置如下:
serviceName: 用于定义 controller 部署的 Headless Service 的名称。replicas: 用于定义 Seata Server 的副本数量image: 定义了 Seata Server 的镜像名称store.resources: 用于定义挂载的存储资源要求
为这个四个参数分别设计一个命令参数,其中必须指定的是replicas,其他的为用户可选,如果不选择就是用默认值。同时为该条配置指定名称name,
同时制定持久化yml命令persist,用于将此配置文件持久化。
完整的命令如下:
seata-ctl deploy --name deploy1 -- replica 3 --storage 5Gi --serviceName SeataServer --image seataio/seata-server:latest --persist true为了让用户能知道具体执行的yml是什么,在用户运行此命令后,会在控制台输出包含这几个核心标签的yml文件(如果用户不配置持久化的话,如果配置就直接生成文件即可)(类似mockgen的方式),并显示执行结果。
同时,可能有用户需要使用自定义资源的yml文件进行部署,seata-ctl同时提供根据yml文件部署的方式,具体命令为:
seata-ctl deploy --name deploy1 --file seata.yml这样运行命令,就不需要展示yml文件,同时出现其他参数也会被视为非法而显示错误信息。此处的yml文件为固定格式的自定义cr文件。
1.1.3.3 删除资源:
1.1.3.3.1 命令:
seata-ctl undeploy1.1.3.3.2 参数:
提供两个参数:
name:部署资源时的名字
servername:资源的种类
这两个命令只能选择一个,选择多报错,找不到对应的名称也报错。
1.1.3.4 扩容/缩容:
1.1.3.4.1 命令:
k8s中使用scale(规模)这个词进行扩缩容,在这里同样使用这个单词。
seata-ctl scale1.1.3.4.2 参数:
提供两个参数:
name:部署资源时的名字
replica:新的机器数量
进行命令的同时,如果进行了持久化则同步修改配置文件。
1.1.3.5 展示状态:
1.1.3.5.2 命令:
seata-ctl status1.1.3.5.3 参数:
提供一个参数:
name:部署资源时的名字
1.1.3.5.4 展示:
展示状态时,为了增加可读性和美观程度,采用tui的方式进行展示。
go语言的tui有很多,拟采取tview(https://github.com/rivo/tview)进行展示,主要原因这个库较为成熟(包括k9s在内的很多项目都是使用这个库进行开发的),star数较多,功能强大,而且依旧保持维护状态。
展示的结果应当是一个表格,每一个副本为一行,展示其当前状态等信息。
表格的示例如下:

展示的指标暂时如下:
主要考虑事务状态和接口的可用性。
服务可用性:
显示Seata Server的运行状态,是否处于活跃状态。
显示服务的响应时间,以评估服务性能。
接口的可用性 (主要考虑)
资源使用情况:
CPU使用率:监控Seata Server的CPU使用情况。
内存使用率:监控Seata Server的内存使用情况。
磁盘使用率:监控Seata Server的磁盘使用情况,特别是日志和数据存储。
事务状态:(主要考虑)
事务总数:显示当前Seata Server处理的事务总数。
活跃事务数:显示当前正在进行中的事务数量。
完成事务数:显示已成功提交或回滚的事务数量。
事务超时数:显示因超时而失败的事务数量。
错误和异常:
错误日志:显示错误和异常的日志信息,帮助定位问题。
异常率:显示异常发生的比例。
配置信息:
显示Seata Server的配置参数,如事务超时时间、存储模式等。
集群健康状态:
显示集群中各个Seata Server实例的健康状态。
显示集群的负载均衡情况。
1.1.4 实现方案:
1.1.4.1 数据结构与持久化:
这个ctl并不需要在后台运行,所以需要持久化用户的配置,拟采用配置文件的形式进行存储。配置文件分为两种,一种是ctl的全局配置文件,存储连接信息,yml配置文件位置等全局的信息。另一种是yml配置文件,由用户导入或者由系统自动生成。方便用户管理。
1.1.4.2 代码实现:
使用当前seata-cli 的cobra包实现,新增cmd命令,读取命令进行判断并转换为yml的模块,进行文件处理的模块,发送请求的模块,进行tui展示的模块以实现功能。
1.2 读取 Prometheus 中 Seata 相关的指标进行展示:
1.2.1 设计目标:
Seata 已经集成了 Prometheus ,可以收集一些指标。如下:
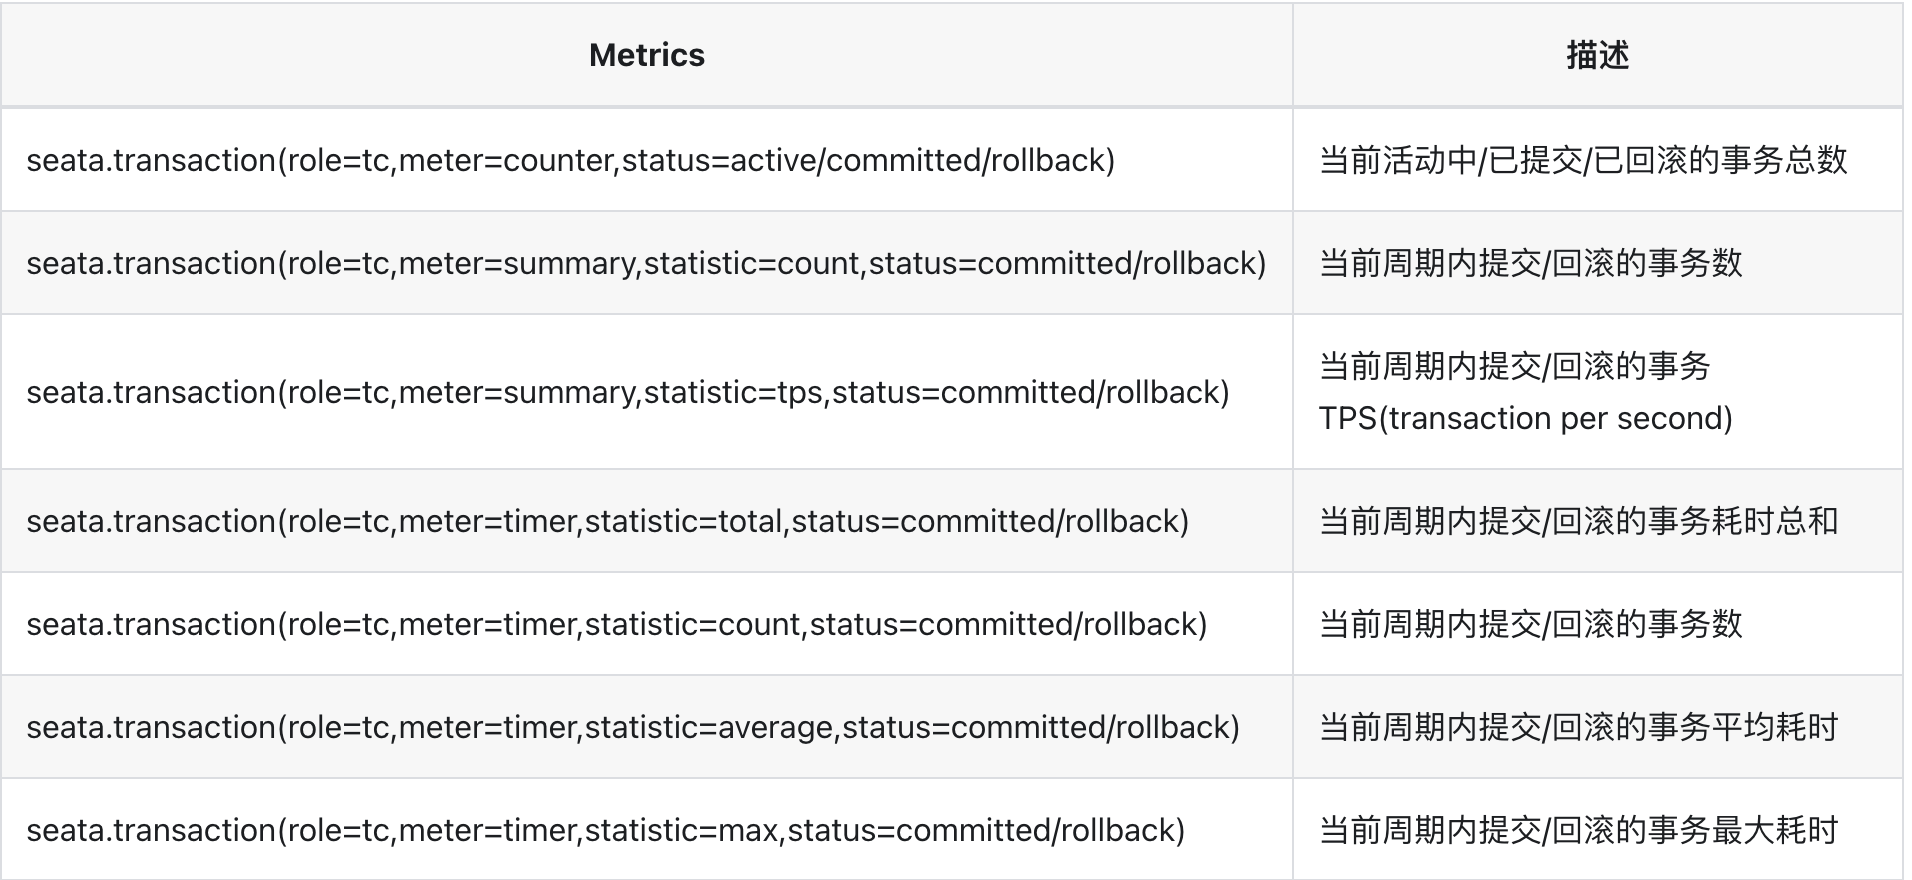
现在需要通过seata-ctl去展示这些指标,并做用户友好的输出。
1.2.2 命令设计:
1.2.2.1 展示数据:
1.2.2.1.1 命令:
seata-ctl metrics1.2.2.1.2 参数:
name:部署Kubernetes资源的名字
target:表示查询的指标
因为seata的Metrics模块可以使用SPI拓展,所以为了后续的可拓展性,采取一个参数,表示Metrics获取的渠道。
region:表示使用的监控组件的名称,该名称在全局配置文件中配置。如果在Prometheus中,则为使用Prometheus进行监控。
1.2.2.1.3 展示数据:
事务相关:
事务提交数 (
seata.tm.commit):成功提交的事务数量。事务回滚数 (
seata.tm.rollback):由于某种原因而回滚的事务数量。全局事务数量 (
seata.tm.global):当前活跃的全局事务数量。分支事务数量 (
seata.tm.branch):当前活跃的分支事务数量。事务提交平均耗时 (
seata.tm.commit_duration):事务提交操作的平均耗时。事务回滚平均耗时 (
seata.tm.rollback_duration):事务回滚操作的平均耗时。
性能指标相关:
CPU:
cpu_usage:CPU的总体使用率。
内存:
memory_usage:内存的总体使用量。memory_free:可用内存量。
磁盘:
disk_used:已使用的磁盘空间。disk_free:可用的磁盘空间。
网络:
network_receive_bytes:接收的网络流量。network_transmit_bytes:发送的网络流量。
1.2.2.1.3 展示方式:
同样采取tui表格的方式进行展示。表格的行为参数,右侧为值。
1.2.3 实现:
1.2.3.1 工作流程:
1.部署seata,并在配置中开启Prometheus metrics 的采集配置。
2.部署Prometheus,修改Prometheus使其指向seata-sever的地址。
3.在本地的seata-ctl中,在配置文件中配置Prometheus地址与认证相关信息。
4.运行日志命令,获取metrics指标。
如果用户部署的Prometheus部署在seata-server的kubernetes集群之外,还需要配置nacos等信息,让ctl能获取到每个seata-server节点的地址。
1.2.3.2 实现:
需要在代码中编写数据读取模块,数据结构转换模块,展示模块。
1.3 seata日志诊断分析:
1.3.1 设计目标:
当前的seata没有统一的日志收集工具,用户如果要查询某些日志只能一台一台机器上去查询。
在seata的可观测实践(https://seata.apache.org/zh-cn/blog/seata-observable-practice/#logging%E7%BB%B4%E5%BA%A6)这篇文章中,将可观测性分为三个维度:
Metrics:主要关注机器的当前运行状态。
Tracing:主要关注事务链路的相关信息
Logging:日志包含seata操作的所有信息,可以实现链路追踪与统计分析的功能。
对于当前的seata集群来说,一个事务可能会经过多个实例最终完成,而每个实例的日志都是不同的,而每个实例的日志都会存在本地,不能做到有效的互通。自然无法进行有效的分析。
现在需要设计一整套seata集群的日志诊断分析工具,并使用seata-ctl实现查看日志分析结果的功能。
1.3.2 命令设计:
1.3.2.1 部署:
1.3.2.1.1 命令:
seata-ctl logdeploy该命令会根据文件夹下的全局配置文件初始化选择server的具体部署方式。
1.3.2.2 展示聚合日志:
1.3.2.2.1 命令:
seata-ctl log 1.3.2.2.2 参数:
name:部署资源时的名字
tag:查询参数指标
1.3.3 架构设计:
在分布式环境中实现日志收集与聚合的完整解决方案通常涉及以下几个组件:
日志收集器:
负责从各个服务实例中捕获日志。
日志存储系统:
用于存储收集到的日志数据。
日志索引与查询:
对日志数据建立索引,便于快速查询和分析。
日志可视化与分析:
创建仪表板和可视化查询结果。
当前官网上推荐的对seata进行日志分析的方式是采用ELK技术栈:
Elasticsearch:承担日志存储与索引建立的功能。一个实时的分布式搜索和分析引擎,用于存储、搜索和分析大规模的结构化和非结构化数据。Elasticsearch 提供了强大的全文搜索、实时分析和聚合功能,使用户能够轻松地从海量数据中提取有价值的信息。
Logstash:承担日志收集的功能。一个用于日志收集、处理和转发的数据处理管道。Logstash 可以从各种来源收集日志数据,如文件、消息队列、数据库等,然后对数据进行过滤、转换和丰富,最后将处理后的数据发送到 Elasticsearch 或其他存储和分析系统中。
Kibana:承担日志分析的功能。一个用于数据可视化和分析的开源工具。Kibana 提供了丰富的图表、仪表盘和可视化组件,使用户可以轻松地探索和分析 Elasticsearch 中的数据,并创建交互式的可视化报告。
我们开发此工具需要考虑其应用场景,使其尽可能多的适配不同的场景,可能现在有的公司使用ELK,或者当前并没有针对seata的日志系统需要接入,seata-ctl都需要支持。
参考go-micro的代码插装思路设计,分别为这三个功能建立server,并通过接口的方式实现互相的交互。用户可以自由的选择是否需要该层的功能,并选择每一层采用什么方式实现,将这些配置在seata-ctl的主配置文件仓库中。
可以用下面这张示意图表示:
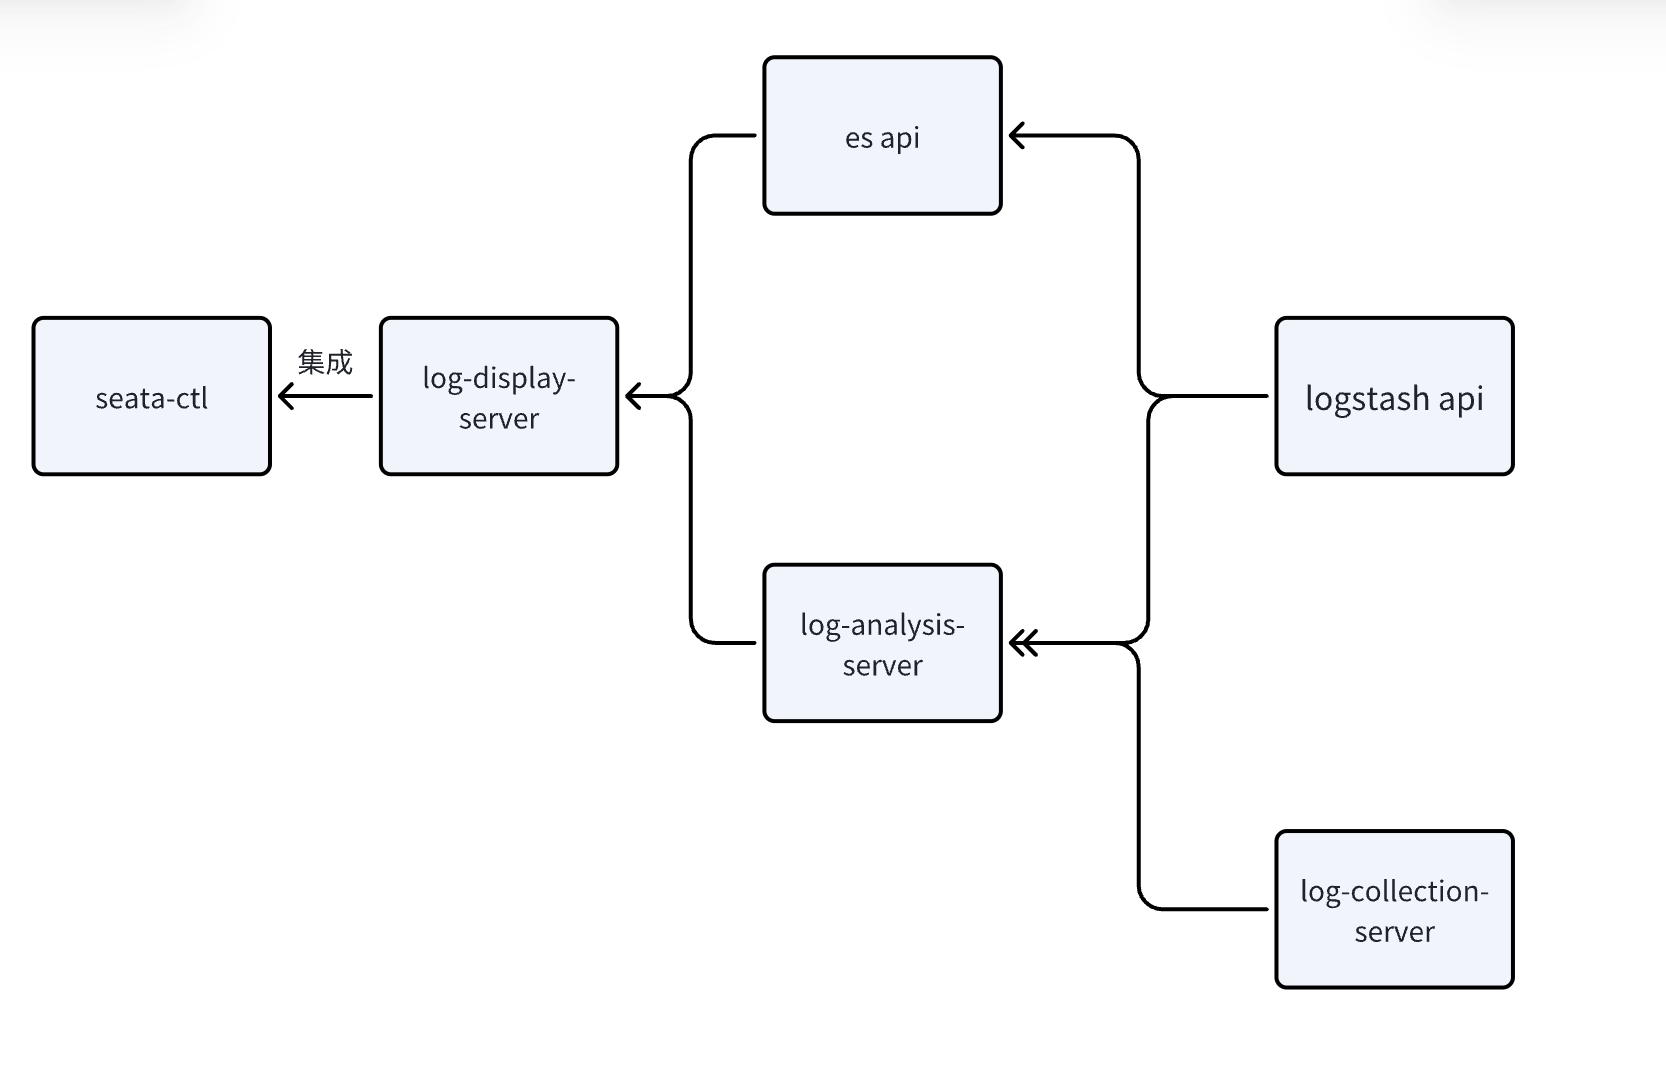
下面分别介绍这三个server。
1.3.3.1 日志收集组件:Log-collection-server:
这一部分的功能是收集 K8s 中每一个seata-server节点的pod日志,并发送到指定的位置。
这个组件通常部署在seata server的kubernetes集群中,需要修改incubator-seata-k8s中的reconcile方法与crd定义,使这个工具与seata-server部署在同一个pod中。
此时这个中间件的逻辑基本与logstath相同,只是从文件和输出流中获取到日志,然后转发到制定的端口中。
调研一下现成的
1.3.3.2 日志分析组件:Log-analysis-server:
这一部分的功能是接收特定格式的日志,并进行特定方式的转换。并提供转换之后的api以供日志展示系统进行访问。
如果是部署在seata server的kubernetes集群中,通过定时任务的方式,根据seata-server集群内部的名字处理相应的pod的日志,做处理(主要是根据格式转换),之后持久化在特定的卷中。
参考标准
1.3.3.3 日志展示组件:Log-display-server:
与seata-ctl集成在一起。
获取日志分析系统的数据,按照用户输入进行展示。
这个系统的主要功能就是解析命令行,然后根据配置相关参数去访问特定的url,获取数据使用tui展示之后返回给用户。不存在部署位置的问题。
1.3.2.4 用户使用:
第三个系统是与seata-cli强绑定绑定在一起的,与两个系统解耦。这样用户在使用的时候就会出现以下几种情况:
1.3.2.4.1 全部部署在本地:
如果用户的电脑性能非常好(比如新款的mac),而又没有其他的日志收集系统,那么可以选择三个server全部集成部署在本地。这样当用户输入命令时,三个系统的工作全部在本地进行。
当部署在本地时,三个server通过程序内部进行数据交互。
但是在这种方式下,收集系统和分析系统无法长时间运行,所以每次使用都需要等带较长的时间才能得到结果。
1.3.2.4.2 部分系统部署在用户自己的服务器:
为了性能和用户体验考虑,用户可以选择将分析系统或者收集系统部署在自己的服务器上。
当部署在服务器时,部署在服务器的系统和部署在本地的系统之间通过http/rpc通信进行交互。
如果使用这种方式部署自己的收集系统和展示系统,可以通过设置定时任务的方式,定时的去拉取seata集群的日志数据并作一定的聚合分析,这样当seata-ctl访问时可以直接获取到结果。
1.3.2.4.3 部分系统使用现有工具:
比如已经搭建好了elk全套技术,那么只需要对接es的相关接口并作展示。
又比如目前只有Logstash做日志收集,那么需要对接Logstash的相关接口。(但是这种情况估计很难发生,所以暂时可以考虑不做。)
这三个server的使用方式和一些其他的配置全部都在ctl的主配置文件中进行。
1.4 全局配置文件介绍:
该文件包含seata-ctl各种连接的配置,以及日志诊断分析节点的部署情况。
该文件主要包括三部分:
k8s集群的连接信息
Prometheus 的相关连接信息
日志诊断分析系统的配置信息
使用yml格式,仿照springboot的application.yml文件进行设计。简要的示意图如下:
Kubernetes:
    cluster:
        name:
        kubeconfigpath:
        ymlpath:
    ....
Prometheus:
    server:
        name:
        address:
        auth:
    ....
Log:
    cluster:
        name:
        collection:
            enable:
            loacl:
        analysis:
            enable:
            local:
        display:
            type:此处指明为是对接自己的collection-analysis系统或者es
            path:
            local:
    ....
1.4.1 与配置文件相关的命令:
1.4.1.1 制定/修改全局配置文件的位置:
1.4.1.1.1 命令:
seata-ctl config1.4.1.1.2 参数:
path全局配置文件的位置。
2.2.2 开发过程细节
2.2.2.1 开发基本过程
在开发阶段,每周主动联系导师开会,根据导师的意见修改。每双周的社区会上汇报进度。
因为前期实习工作较忙,所以基本都是周末开发的,预估工作量的话,7,8月大概开发了百分之四十,9.10月完成剩下的百分之六十。
2.2.2.2 全局配置文件
设1个命令:config 一个path参数
如果path中什么也没有 就初始化一个 弄个模版,如果有 就去搜索。
模仿kubeconfig的context机制,设计config文件。
2.2.2.3 kubernetes部分
使用client-go部署crd和controller应该怎么操作?这部分教程非常少,中文的几乎搜不到。
遇到的最大问题是拟采用client-go操作,但是client-go无法部署controllre和crd.因为crd的定义结构过于复杂,无法识别。
一开始只想到了下面这四种解决方案:
使用dynamic client
自己参照kubectl apply的源代码实现一个
默认用户电脑上安装着kubectl,直接调用他的命令
人工手动一条一条对上百行的yaml文件
最后找到了新思路:绕过client-go,直接手动组装https请求发送向api-server。
deploy,undeploy,scale,status未遇到大问题。
2.2.3.4 prometheus部分
找不到数据来源:本地seata跑不起来,所以只能用mock的数据。
反正对prometheus来说都一样,直接编写了一个go语言方法mock数据。
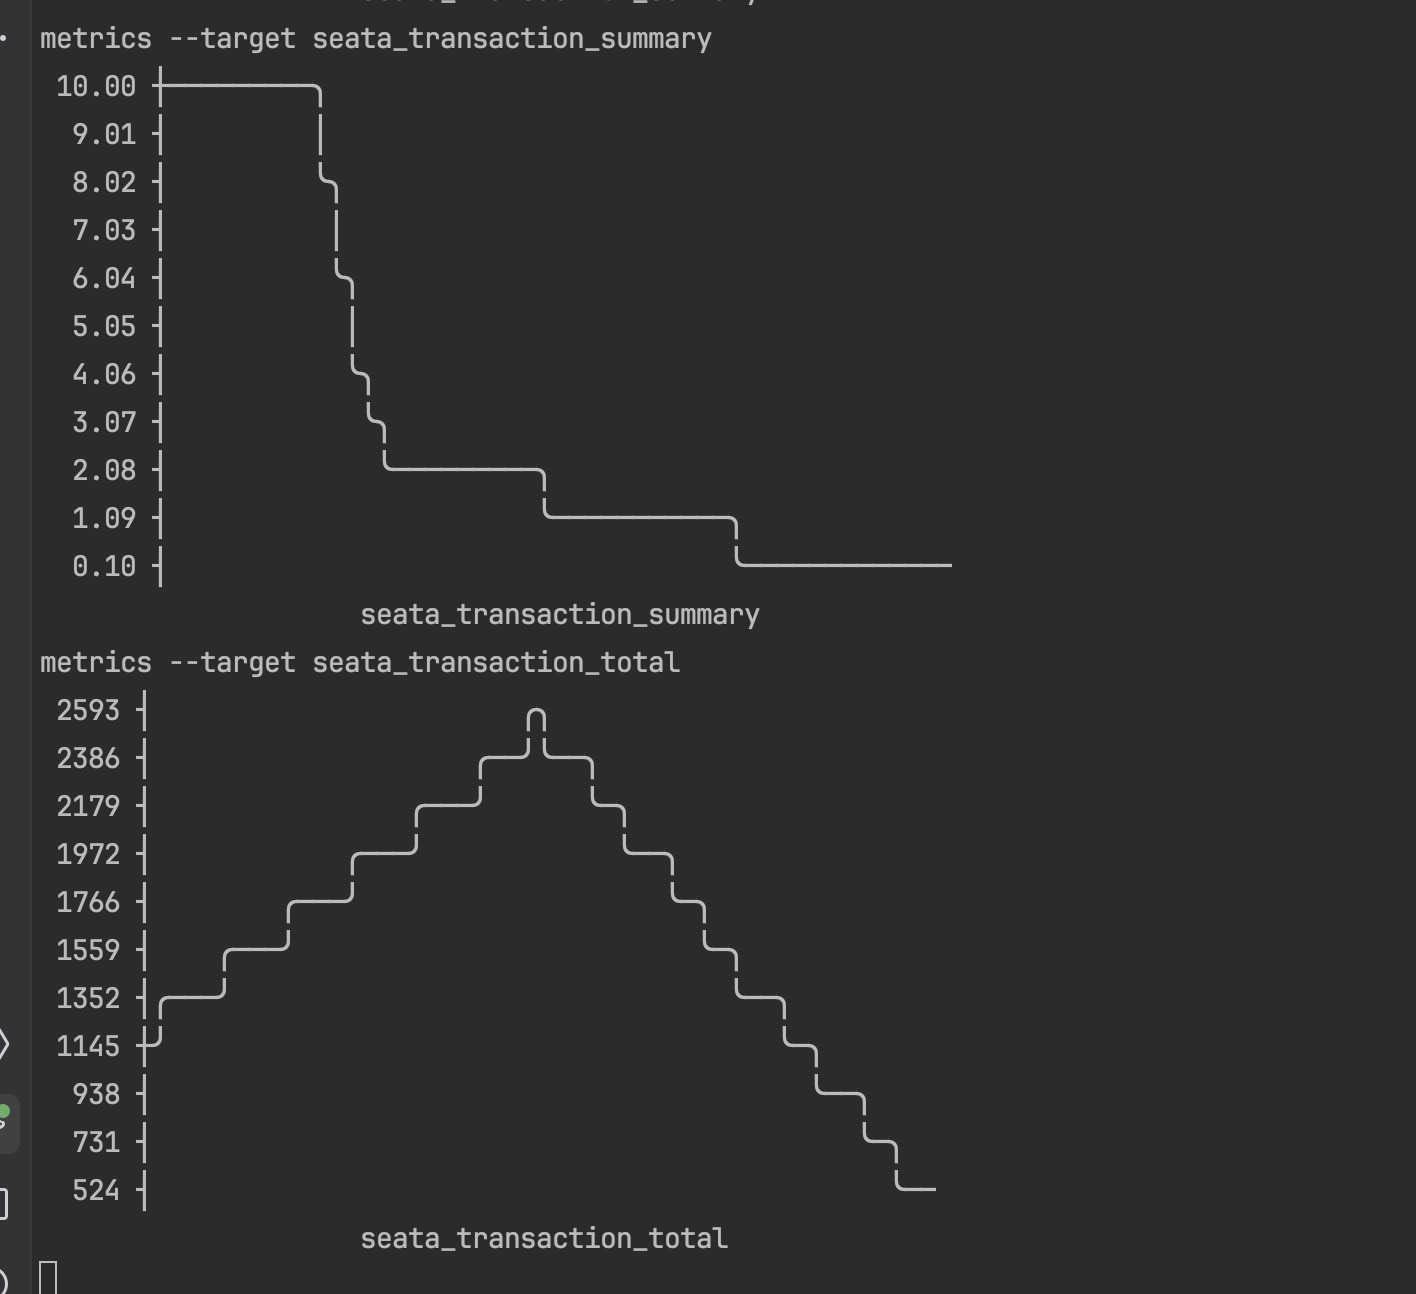
还有展示库选型问题:最终选择了一个ascll码的库实现功能。
2.2.3.5 日志部分
2.2.3.5.1 日志收集:
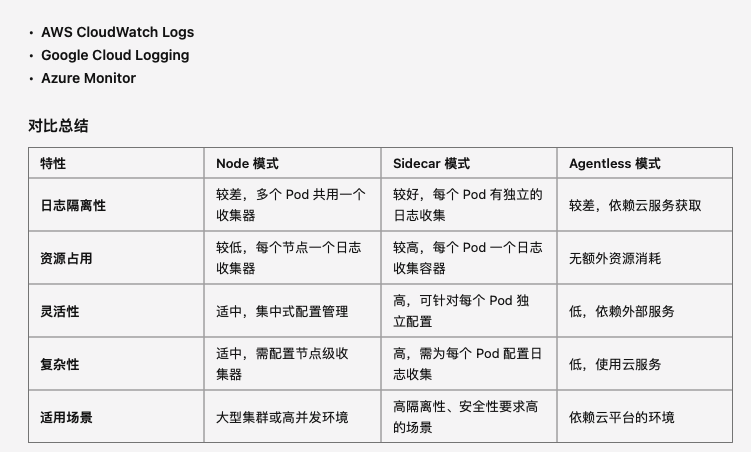
日志收集系统主要有三种常见的部署模式:Node 模式、Sidecar 模式 和 Agentless 模式。
Node 模式是指在每个 Kubernetes 节点上运行一个日志收集器,这个日志收集器负责收集节点上所有 Pod 生成的日志,然后将日志发送到集中式日志存储系统。
Sidecar 模式是指在每个应用 Pod 中部署一个日志收集器容器,这个容器与应用容器一起运行,负责收集该 Pod 的日志并发送到日志存储系统。
Agentless 模式是指不在节点或 Pod 中运行日志收集器,而是通过系统自带的日志服务(如 Kubernetes API 或云提供商的日志服务)来收集日志。
他们的优劣势对比如下:
2.2.3.5.2 整体方案:
对接三种不同的平台
prometheus + loki
ELK (Elasticsearch, Logstash, Kibana)
自研:sidecar模式日志收集器,日志处理器
使用一个通用接口对接三个平台
QueryLogs(filter map[string]interface{}) ([]string, error)每个平台一种不同的实现。
由于每个平台的
入参不同 返回值结构体不同,因此设计了以下结构
入参分为两部分 一部分为公共配置 由yaml输入 一部分为命令行输入
初始化client的时候会根据类型选择不同的参数
获取对应的参数后,统一编写代码转换成符合接口的类型返回,这样可以把拓展性提到最高。
日志结构示例
2023-10-17 14:15:23.345 INFO [UndoLogManager] --- Unleashing undo log for XID: 172.16.20.1:8091:123456789
2023-10-17 14:15:23.348 INFO [RMHandler] --- Branch committing: BranchSession [branchId=987654321, xid=172.16.20.1:8091:123456789, resourceId=jdbc:mysql://localhost:3306/seata_test, status=PhaseTwo_Committed]
2023-10-17 14:15:23.351 INFO [SQLUndoLogManager] --- SQL Undo Log added to the database for branch ID: 987654321
2023-10-17 14:15:23.354 INFO [LockManager] --- Lock released for XID: 172.16.20.1:8091:123456789, branchId: 987654321
2023-10-17 14:15:23.357 INFO [TCSession] --- Global transaction [XID: 172.16.20.1:8091:123456789] commit succeeded
2023-10-17 14:15:23.360 INFO [RMHandler] --- Transaction resource committed successfully: ResourceId:jdbc:mysql://localhost:3306/seata_test, XID: 172.16.20.1:8091:123456789
2023-10-17 14:15:23.363 INFO [TransactionManager] --- Transaction [XID: 172.16.20.1:8091:123456789] ends with SUCCESS.
es操作
创建的api
curl -X PUT "https://localhost:9200/seata_logs" -u "elastic:bu4AC50REtt_7rUqddMe" --insecure -H 'Content-Type: application/json' -d'
{
  "mappings": {
    "properties": {
      "timestamp": {
        "type": "date"
      },
      "logLevel": {
        "type": "keyword"
      },
      "module": {
        "type": "keyword"
      },
      "xid": {
        "type": "keyword"
      },
      "branchId": {
        "type": "keyword"
      },
      "resourceId": {
        "type": "keyword"
      },
      "message": {
        "type": "text"
      }
    }
  }
}'
set数据的api
插入日志
curl -X POST "https://localhost:9200/seata_logs/_doc" -u "elastic:bu4AC50REtt_7rUqddMe" --insecure -H 'Content-Type: application/json' -d'
{
"timestamp": "2023-10-17T14:15:23.345Z",
"logLevel": "INFO",
"module": "UndoLogManager",
"xid": "172.16.20.1:8091:123456789",
"branchId": "987654321",
"resourceId": "jdbc:mysql://localhost:3306/seata_test",
"message": "Unleashing undo log for XID: 172.16.20.1:8091:123456789"
}'
curl -X POST "https://localhost:9200/seata_logs/_doc" -u "elastic:bu4AC50REtt_7rUqddMe" --insecure -H 'Content-Type: application/json' -d'
{
"timestamp": "2023-10-17T14:15:23.348Z",
"logLevel": "INFO",
"module": "RMHandler",
"xid": "172.16.20.1:8091:123456789",
"branchId": "987654321",
"resourceId": "jdbc:mysql://localhost:3306/seata_test",
"message": "Branch committing: BranchSession [branchId=987654321, xid=172.16.20.1:8091:123456789, resourceId=jdbc:mysql://localhost:3306/seata_test, status=PhaseTwo_Committed]"
}'
curl -X POST "https://localhost:9200/seata_logs/_doc" -u "elastic:bu4AC50REtt_7rUqddMe" --insecure -H 'Content-Type: application/json' -d'
{
"timestamp": "2023-10-17T14:15:23.351Z",
"logLevel": "INFO",
"module": "SQLUndoLogManager",
"xid": "172.16.20.1:8091:123456789",
"branchId": "987654321",
"resourceId": "jdbc:mysql://localhost:3306/seata_test",
"message": "SQL Undo Log added to the database for branch ID: 987654321"
}'
loki操作
上传:使用json
{
  "streams": [
    {
      "stream": {
        "job": "seata-transaction"
      },
      "values": [
        [
          "1729180575000000000",
          "2023-10-17 14:15:23.345 INFO  [UndoLogManager] --- Unleashing undo log for XID: 172.16.20.1:8091:123456789"
        ],
        [
          "1729180575000000000",
          "2023-10-17 14:15:23.348 INFO  [RMHandler] --- Branch committing: BranchSession [branchId=987654321, xid=172.16.20.1:8091:123456789, resourceId=jdbc:mysql://localhost:3306/seata_test, status=PhaseTwo_Committed]"
        ],
        [
          "1729180575000000000",
          "2023-10-17 14:15:23.351 INFO  [SQLUndoLogManager] --- SQL Undo Log added to the database for branch ID: 987654321"
        ],
        [
          "1729180575000000000",
          "2023-10-17 14:15:23.354 INFO  [LockManager] --- Lock released for XID: 172.16.20.1:8091:123456789, branchId: 987654321"
        ],
        [
          "1729180575000000000",
          "2023-10-17 14:15:23.357 INFO  [TCSession] --- Global transaction [XID: 172.16.20.1:8091:123456789] commit succeeded"
        ],
        [
          "1729180575000000000",
          "2023-10-17 14:15:23.360 INFO  [RMHandler] --- Transaction resource committed successfully: ResourceId: jdbc:mysql://localhost:3306/seata_test, XID: 172.16.20.1:8091:123456789"
        ],
        [
          "1729180575000000000",
          "2023-10-17 14:15:23.363 INFO  [TransactionManager] --- Transaction [XID: 172.16.20.1:8091:123456789] ends with SUCCESS."
        ]
      ]
    }
  ]
}
~
"job": "seata-transaction"为lable 类似于数据库的名称
api
curl -X POST http://localhost:3100/loki/api/v1/push \
  -H "Content-Type: application/json" \
  --data @test789_updated.json
需要注意时间,否则有可能上传不上去。
jq '.streams[].values |= map([(. | .[0] | (now * 1000000000 | floor | tostring)), .[1]])' test789.json > test789_updated.json查询 传入label
为了做到动态label 直接使用原始格式的字符串。
log --label={stream=stderr}
log --label={"stream="stderr"}
log --label={stream=""}
log --label={job="seata-transaction"} --start=2024-10-18-14:21:21 --end=2024-10-18-22:16:14
log --label={job="seata-transaction"} --start=2024-10-19-22:00:43 --end=2024-10-20-23:01:43自研
收集器
不依赖日志格式 需要controller动态的配置 两个挂载
log --label={stream=stderr11} --number=3
kubernetes:
clusters:
- name: "cluster1"
kubeconfigpath: "/Users/wpy/.kube/config"
ymlpath: ""
- name: "seata"
kubeconfigpath: "/Users/wpy/Documents/Kubernetes/remotekube.txt"
ymlpath: ""
prometheus:
servers:
- name: "prometheus"
address: "http://localhost:9092"
auth: ""
log:
clusters:
- name: "es"
types: "ElasticSearch"
address: "https://localhost:9200"
source: "seata_logs"
auth: "bu4AC50REtt_7rUqddMe"
collection:
enable: true
local: ""
analysis:
enable: true
local: ""
display:
displayType: ""
path: ""
local: ""
- name: "loki"
types: "Loki"
address: "http://localhost:3100"
source: ""
auth: ""
collection:
enable: true
local: ""
analysis:
enable: true
local: ""
display:
displayType: ""
path: ""
local: ""
context:
kubernetes: "cluster1"
prometheus: "prometheus"
log: "loki"
/日期/机器名字/日志.log
filebeat.inputs:
  - type: container
    paths:
      - /var/log/containers/*.log
    processors:
      - add_kubernetes_metadata:
          in_cluster: true
      - drop_event:
          when:
            not:
              equals:
                kubernetes.pod.name: "example-seataserver-0"
output.elasticsearch:
  hosts: ["http://localhost:9200"]
  username: "elastic"
  password: "bu4AC50REtt_7rUqddMe"
/var/lib/docker/containers/*.log
ageTag: 8.3.2
daemonset:
# 移除 secretMounts 以避免挂载不必要的证书
secretMounts: []
# 定义额外的环境变量,例如 Elasticsearch 的连接信息
extraEnvs:
- name: ELASTICSEARCH_HOST
value: 10.241.182.31
- name: ELASTICSEARCH_PORT
value: "9200"
- name: NODE_NAME
valueFrom:
fieldRef:
fieldPath: spec.nodeName
- name: ELASTICSEARCH_USERNAME
value: elastic
- name: ELASTICSEARCH_PASSWORD
value: bu4AC50REtt_7rUqddMe
securityContext:
runAsUser: 0
privileged: true # 赋予 root 权限以确保 Filebeat 能读取日志
filebeatConfig:
filebeat.yml: |
filebeat.inputs:
- type: container
paths:
- /var/lib/docker/containers/*.log # 使用 Docker 容器日志路径
processors:
- add_kubernetes_metadata:
in_cluster: true
output.elasticsearch:
hosts: ["https://${ELASTICSEARCH_HOST}:${ELASTICSEARCH_PORT}"]
username: ${ELASTICSEARCH_USERNAME}
password: ${ELASTICSEARCH_PASSWORD}
ssl.verification_mode: "none"fluentd-bit
helm部署的无法正常使用。
需要手动修改configmap文件
apiVersion: v1 kind: ConfigMap metadata: name: fluent-bit-config namespace: kube-system data: fluent-bit.conf: | [SERVICE] Flush 1 Log_Level info Parsers_File parsers.conf
[INPUT]
Name tail
Path /var/log/containers/*.log
Parser docker
Tag kube.*
Refresh_Interval 5
Mem_Buf_Limit 5MB
Skip_Long_Lines On
DB /var/log/flb_kube.db
[FILTER]
Name kubernetes
Match kube.*
Kube_URL https://kubernetes.default.svc:443
Kube_Tag_Prefix kube.var.log.containers.
Merge_Log On
K8S-Logging.Parser On
K8S-Logging.Exclude On
[OUTPUT]
Name loki
Match kube.*
Host loki
Port 3100
URI /loki/api/v1/push
Labels job=fluent-bit
Auto_Kubernetes_Labels On可用的configmap
    [OUTPUT]
        Name es
        Match kube.*
        Host 10.241.189.186
        Port 9200
        HTTP_User elastic
        HTTP_Passwd bu4AC50REtt_7rUqddMe
        tls On
        tls.verify Off
        Retry_Limit False
        Logstash_Format On
        Suppress_Type_Name On
2.2.3 使用文档
为seata-ctl开发的使用文档,相当于github项目的readme。
使用英文编写,主要就是用中文写好了让翻译器翻译。
Introduction
This is a CLI tool for Seata named seata-ctl.
$ seata-ctl -h
seata-ctl is a CLI tool for Seata
Usage:
seata-ctl [flags]
seata-ctl [command]
Available Commands:
version Print the version number of seata-ctl
Flags:
-h, --help help for seata-ctl
--ip string Seata Server IP (constants "127.0.0.1")
--password string Password (constants "seata")
--port int Seata Server Admin Port (constants 7091)
--username string Username (constants "seata")
Use "seata-ctl [command] --help" for more information about a command.Build
Dependency: Go 1.19+
go build .How to use
Seata
Some Seata commands are used to connect to the Seata server for configuration browsing, transaction simulation, and other functions. To use these features, you must first log in using the Login command.
Login
Use this command to log in to the seata section. If the login is successful, the login information will be displayed at the beginning of the command line.
$ seata-ctl login --ip=127.0.0.1 --port=7091 --username=seata --password=seata
127.0.0.1:7091 > # input command here
Help
127.0.0.1:7091 > help
Usage:
[command] [flag]
Available Commands:
get Get the resource
help Help about any command
quit Quit the session
reload Reload the configuration
set Set the resource
try Try example transactionsGet
Usage
127.0.0.1:7091 > get -h
Get the resource
Usage:
get [flags]
get [command]
Available Commands:
config Get the configuration
status Get the status
Flags:
-h, --help help for get
Use "get [command] --help" for more information about a command.Example
Get the status of the Seata server cluster:
127.0.0.1:7091 > get status
+-------+--------------------+--------+
| TYPE  | ADDRESS            | STATUS |
+-------+--------------------+--------+
| nacos | 192.168.163.1:7091 | ok     |
+-------+--------------------+--------+
| nacos | 192.168.163.2:7091 | ok     |
+-------+--------------------+--------+
Get the configuration
server.servicePort:
127.0.0.1:7091 > get config --key '["server.servicePort"]'
+--------------------+-------+
| KEY                | VALUE |
+--------------------+-------+
| server.servicePort | 8091  |
+--------------------+-------+
Get multiple configuration (which could be written in multiple lines by ending with '\'):
127.0.0.1:7091 > get config --key '[ \
    "server.servicePort", \
    "server.recovery.timeoutRetryPeriod", \
    "server.undo.logDeletePeriod" \
]'
+------------------------------------+----------+
| KEY                                | VALUE    |
+------------------------------------+----------+
| server.recovery.timeoutRetryPeriod | 1000     |
| server.servicePort                 | 8091     |
| server.undo.logDeletePeriod        | 86400000 |
+------------------------------------+----------+
Get all configurations
127.0.0.1:7091 > get config
+------------------------------------+----------+
| KEY                                | VALUE    |
+------------------------------------+----------+
...
Set
Usage
127.0.0.1:7091 > set -h
Set the resource
Usage:
set [flags]
set [command]
Available Commands:
config Set the configuration
Flags:
-h, --help help for set
Use "set [command] --help" for more information about a command.127.0.0.1:7091 > set config -h
Set the configuration
Usage:
set config [flags]
Flags:
--config-center If set configuration center conf
--data string Configuration map (constants "{}")
-h, --help help for config
--registry If set registry confExample
Set the registry config, such as setting type to
eureka:
127.0.0.1:7091 > set config --registry --data '{"registry.type": "eureka"}'
+---------------+------+--------+
| KEY           | FROM | TO     |
+---------------+------+--------+
| registry.type | file | eureka |
+---------------+------+--------+
You can found that the Seata server is registered at eureka registry.
Set the configuration center config, such as setting type to
nacos
127.0.0.1:7091 > set config --config-center --data '{"config.type": "nacos"}'
+-------------+------+-------+
| KEY         | FROM | TO    |
+-------------+------+-------+
| config.type | file | nacos |
+-------------+------+-------+
You can found that the configuration in nacos is loaded.
Set a configuration item which can be dynamically configured (such as
server.undo.logSaveDays):
127.0.0.1:7091 > set config --data '{"server.undo.logSaveDays": "5"}'
+-------------------------+------+----+
| KEY                     | FROM | TO |
+-------------------------+------+----+
| server.undo.logSaveDays | 6    | 5  |
+-------------------------+------+----+
Set multiple configurations at the same time:
127.0.0.1:7091 > set config --data '{ \
    "server.maxCommitRetryTimeout": "3000", \
    "server.maxRollbackRetryTimeout": "3000", \
    "server.undo.logSaveDays": "14" \
}'
+--------------------------------+------+------+
| KEY                            | FROM | TO   |
+--------------------------------+------+------+
| server.maxCommitRetryTimeout   | -1   | 3000 |
| server.maxRollbackRetryTimeout | -1   | 3000 |
| server.undo.logSaveDays        | 5    | 14   |
+--------------------------------+------+------+
Try
Usage
127.0.0.1:7091 > try -h
Try if this node is ready
Usage:
try [flags]
try [command]
Available Commands:
begin begin a txn
commit commit a txn
rollback rollback a txn
Flags:
-h, --help help for try
Use "try [command] --help" for more information about a command.Example
Try to begin an example transaction:
127.0.0.1:7091 > try begin --timeout 300000
Try an example txn successfully, xid=192.168.163.1:8091:8755443813836259333
Commit a transaction by xid:
127.0.0.1:7091 > try commit --xid 192.168.163.1:8091:8755443813836259333
Commit txn successfully, xid=192.168.163.1:8091:8755443813836259333
Rollback a transaction by xid:
127.0.0.1:7091 > try rollback --xid 192.168.163.1:8091:8755443813836259333
Rollback txn successfully, xid=192.168.163.1:8091:8755443813836259333
Lifecycle of the transactions could be checked in Web console UI. (exposed at 7091 by default).
Reload
Usage
reload -h
Reload the configuration
Usage:
reload [flags]
Flags:
-h, --help help for reloadExample
127.0.0.1:7091 > reload
Reload Successful!
Quit
Quit the session:
127.0.0.1:7091 > quit
Quit the session
Config
Seata-ctl uses a YAML configuration file to set up various cluster addresses and connection details. Since manually creating this file can be complex for users, Seata-ctl provides a template for the configuration file.
Config
Describe
Used to initialize the configuration file with no parameters required.
After execution, a file named config.yaml will be created in the same directory as the terminal. If the file already exists, a message will indicate this. Currently, selecting a different location is not supported.
Usage
seata-ctl
config
After use, a file named 'config. yaml' will be created in the same directory as the terminal. If the file already exists, it will prompt that it already exists. We currently do not support selecting other locations.
Each cluster can fill in multiple instances, using a context mechanism similar to kubeconfig to select which cluster and service to use.
The format of the file and the meanings of each field are as follows:(The parameters of the log section will be explained in detail later in the log section)
kubernetes:
    clusters:
        - name: ""  //kubernetes cluster name
          kubeconfigpath: ""  //kubeconfig path
          ymlpath: ""   //yml config path,not currently supported
prometheus:
    servers:
        - name: ""  //prometheus name
          address: "" //prometheus address
          auth: ""  //prometheus auth info,not currently supported
log:
    clusters:
        - name: ""  //log name
          types: "" //log type:ElasticSearch,Loki,Local
          address: "" //log server address
          source: ""  //index name
          username: ""  //auth username
          password: ""  //auth password
          index: ""     //index name
context:
    kubernetes: ""  //choose which clusters to use,depend on name
    prometheus: ""  //choose which clusters to use,depend on name
    log: ""         //choose which clusters to use,depend on name
Example
If everything is normal, it will output:
seata-ctl
config
Config created successfully!If the file already exists, it will be output as follows:
seata-ctl
config
Config file already exists!The example of writing a configuration file is as follows:
kubernetes:
  clusters:
    - name: "cluster1"
      kubeconfigpath: "/Users/wpy/.kube/config"
      ymlpath: ""
    - name: "seata"
      kubeconfigpath: "/Users/wpy/Documents/Kubernetes/remotekube.txt"
      ymlpath: ""
prometheus:
  servers:
    - name: "prometheus"
      address: "http://localhost:9092"
      auth: ""
log:
  clusters:
    - name: "es"
      types: "ElasticSearch"
      address: "https://localhost:9200"
      source: "logstash-2024.10.24"
      username: "elastic"
      password: "bu4AC50REtt_7rUqddMe"
      index: "log"
    - name: "loki"
      types: "Loki"
      address: "http://localhost:3100"
      source: ""
      username: ""
      password: ""
      index: ""
    - name: "local"
      types: "Local"
      address: "http://localhost:8080"
      source: "seata"
      username: ""
      password: ""
      index: ""
context:
  kubernetes: "cluster1"
  prometheus: "prometheus"
  log: "es"
Kubernetes
Seata ctl provides various commands to operate Seata servers on Kubernetes clusters.
Install
Describe
Use this command to apply CRD (Custom Resource Definition) and deploy controllers on a Kubernetes cluster` Seata tl 'will use these definitions to complete the deployment of Seata.
Usage
seata-ctl
install --namespace=default --image=apache/seata-controller:latest --name=seata-k8s-controller-manager
Arguments
namespace: Specifies the namespace to use (optional). If not specified, it defaults todefault.image: Specifies the name of the image to use (optional). If not specified, it defaults toapache/seata-controller:latest.name: Specifies the name of the deployed controller (optional). If not specified, it defaults toseata-k8s-controller-manager.
Example
If the CRD is deployed successfully, a message will display: create seata crd success, indicating that a CRD named seataservers.operator.seata.apache.org has been deployed in the specified namespace.
If the Deployment is successful, a message will display: Deployment created successfully, indicating that a Deployment named seata-k8s-controller-manager has been created in the specified namespace, containing a single Pod.
install --namespace=default --image=apache/seata-controller:latest --name=seata-k8s-controller-manager
INFO[0007] Create seata crd success
INFO[0007] Deployment created successfully If the CRD already exists, a message will display: seata crd already exists.
If the Deployment already exists, a message will display: Deployment 'seata-k8s-controller-manager' already exists in the 'default' namespace.
install --namespace=default --image=apache/seata-controller:latest --name=seata-k8s-controller-manager
ERRO[0001] install CRD err: failed to send post request: seata crd already exists
ERRO[0001] install Controller err: Deployment 'seata-k8s-controller-manager' already exists in the 'default' namespace Uninstall
Describe
Use this command to uninstall the CRD and the controller.
Usage
seata-ctl
uninstall --namespace=default --name=seata-k8s-controller-manager
Arguments
namespace: Specifies the namespace to use (optional). If not specified, it defaults todefault.name: Specifies the name of the deployed controller (optional). If not specified, it defaults toseata-k8s-controller-manager.
Example
If the CRD is deleted successfully, a message will display: CRD seataservers.operator.seata.apache.org deleted successfully. If the Deployment is deleted successfully, a message will display: Deployment 'seata-k8s-controller-manager' deleted successfully from namespace 'default'.
uninstall --namespace=default --name=seata-k8s-controller-manager
INFO[0017] delete CRD seataservers.operator.seata.apache.org successfully.
INFO[0017] deleted Controller seata-k8s-controller-manager successfully If the CRD does not exist, a message will display: CRD seataservers.operator.seata.apache.org does not exist, no action taken. If the Deployment does not exist, a message will display: Deployment 'seata-k8s-controller-manager' does not exist in namespace 'default', no action taken.
uninstall --namespace=default --name=seata-k8s-controller-manager
ERRO[0005] CRD seataservers.operator.seata.apache.org does not exist, no action taken.
ERRO[0005] Deployment 'seata-k8s-controller-manager' does not exist in namespace 'default', no action taken. Deploy
Describe
Use this command to deploy the Seata server on the Kubernetes cluster.
Usage
seata-ctl
deploy --name=test --replicas=1 --namespace=default --image=apache/seata-server:latest
After the CR is successfully deployed, the controller will automatically deploy the Seata server instance.
Note: Since the specific namespace where the CRD and controller are installed is uncertain, the Deployment command will not check whether the CRD and controller have been successfully deployed. Before using this command, please ensure that the Seata CRD and controller have been successfully deployed in your cluster.
Arguments
namespace: Specifies the namespace. If not specified, it defaults todefault.replicas: Number of deployment replicas. If not specified, it defaults to1.name: Name of the CR. If not specified, it defaults toexample-seataserver.image: Specifies the name of the image to use (optional). If not specified, it defaults toapache/seata-server:latest.
Example
If the deployment is successful, a message will display: CR install success, name: example-seataserver.
deploy --name=test --replicas=1 --namespace=default --image=apache/seata-server:latest
INFO[0013] CR install success,name: testIf the deployment already exists, a message will display: This seata server already exists!.
deploy --name=test --replicas=1 --namespace=default --image=apache/seata-server:latest
ERRO[0007] deploy err:seata server already exist! name:test If the deployment fails, a message displaying the relevant error information will appear.
deploy --name=test --replicas=1 --namespace=default --image=apache/seata-server:latest
ERRO[0065] deploy err:the server could not find the requested resource If this error occurs, it indicates that the CRD and controller were not successfully deployed. Please check your deployment status.
UnDeploy
Describe
Use this command to uninstall the deployed Seata server.
Usage
seata-ctl
undeploy --name=test --namespace=default
After deletion, the controller will automatically remove the Seata server instance.
Arguments
namespace: Specifies the namespace. If not specified, it defaults todefault.name: Name of the CR. If not specified, it defaults toexample-seataserver.
Example
If the uninstallation is successful, a message will display: CR delete success, name: example-seataserver, indicating that the CR has been successfully uninstalled, and the controller will automatically delete the Seata server from the cluster.
undeploy --name=test --namespace=default
INFO[0308] CR delete success,name: test If the CR is not found, a message will display: seataservers.operator.seata.apache.org "example-seataserver" not found.
undeploy --name=test --namespace=default
ERRO[0290] undeploy error: seataservers.operator.seata.apache.org "test" not found If an exception occurs, the relevant error information will be displayed.
undeploy --name=test --namespace=default
ERRO[0284] undeploy error: the server could not find the requested resource If this error occurs, it indicates that the CRD and controller were not successfully deployed. Please check your deployment status.
Scale
Describe
Use this command to modify the number of replicas for the deployed Seata server.
Usage
seata-ctl
scale --name=test --replicas=2 --namespace=defaultAfter the operation, the controller will automatically adjust the replica count, which may take some time.
Arguments
namespace: Specifies the namespace. If not specified, it defaults todefault.name: Name of the CR. If not specified, it defaults toexample-seataserver.replicas: Number of deployment replicas. If not specified, it defaults to1.
Example
If the modification is successful, a message will display: CR scale success, name: example-seataserver, indicating that the CR has been successfully updated, and the controller will automatically adjust the number of Seata server replicas in the cluster.
scale --name=test --replicas=2 --namespace=default
INFO[0070] CR scale success,name: test If the CR is not found, a message will display: This seata server does not exist!.
scale --name=test --replicas=2 --namespace=default
ERRO[0058] scale err:This seata server does not exits!test Status
Describe
Use this command to view the status of the deployed Seata server on the cluster.
Usage
seata-ctl
status --name=example-seataserver --namespace=defaultNote: This command essentially filters and displays Pods based on their labels. If Seata server Pods were created using other methods (for example, outside of the controller), the relevant Pods may not be found.
Arguments
namespace: Specifies the namespace. If not specified, it defaults to default.
name: The name of the CR created when deploying the Seata server. If not specified, it defaults to example-seataserver.
Example
If everything is functioning correctly, a list of seata-pods will be displayed.
status --name=example-seataserver --namespace=default
INFO[0319] status: POD NAME STATUS
INFO[0319] status: -------------------------------------------
INFO[0319] status: example-seataserver-0 Running If no pods are found, an error message will be displayed.
status --name=example-seataserver1 --namespace=default
ERRO[0002] get k8s status error: no matching pods found Prometheus
Use this command to display data retrieved from Prometheus.
Before using this command, you need to ensure that Prometheus is properly set up and is correctly collecting metrics from Seata.
Metrics
Describe
Use this command to show the data retrieved from Prometheus.
Usage
seata-ctl
metrics --target=seata_transaction_summary
Arguments
target: Specify the metric entry to query. This may vary depending on the system and version, so make sure it aligns with the metrics in Prometheus.
Example
If everything is functioning correctly, the relevant Prometheus metrics will be displayed in the form of a line chart.
metrics --target=seata_transaction_summary
INFO[0095] 10.00 ┼─────────╮
9.01 ┤ │
8.02 ┤ ╰╮
7.03 ┤ │
6.04 ┤ ╰╮
5.05 ┤ │
4.06 ┤ ╰╮
3.07 ┤ ╰╮
2.08 ┤ ╰─────────╮
1.09 ┤ ╰───────────╮
0.10 ┤ ╰─────────────
seata_transaction_summary If an error occurs, an error message will be displayed.
metrics --target=seata_transaction_summary
ERRO[0093] Failed to show metrics: no data found for metric: seata_transaction_summary This error may indicate that the metric was not found. Please check your Prometheus metrics.
Log
Use this command to view logs on Kubernetes, currently supporting ElasticSearch, Loki, and a custom-developed logging platform. Configuration files and query parameters vary between platforms.
Log
Describe
Use this command to retrieve Seata logs from different logging platforms.
Before using this command, please ensure that your logging system is fully deployed and functioning properly.
Usage
ElasticSearch
seata-ctl
log --label={stream=stderr} --number=3Before using ES, you need to make the following configurations in the global configuration file. The meanings of the related parameters are as follows,An example of the configuration is as follows:
    - name: "es"  //name
      types: "ElasticSearch"  //es type
      address: "https://localhost:9200"   //es address
      source: "logstash-2024.10.24"    //es index name
      username: "elastic"   // es auth username
      password: "bu4AC50REtt_7rUqddMe"  //es auth password
      index: "log"  //doc type
Note: Currently, only login with a username and password is supported for ES. If your ES has TLS encryption enabled, it is not supported at this time.
Note: Currently, only login with a username and password is supported for ES. If your ES has TLS encryption enabled, it is not supported at this time.
n the chart, the index field represents the output field for the final log display, which may vary across different index structures in ES.The source contains our index structure and the returned document content, but most of the fields are unnecessary for us. We use the index entry to select among these, and only the matching logs will be outputted.
For example, if the returned structure of our query is this:
{
"took": 2,
"timed_out": false,
"_shards": {
"total": 1,
"successful": 1,
"skipped": 0,
"failed": 0
},
"hits": {
"total": {
"value": 38,
"relation": "eq"
},
"max_score": 1.0,
"hits": [
{
"_index": "logstash-2024.10.24",
"_id": "KyvwyJIB5EKHPP6lI9Os",
"_score": 1.0,
"_ignored": ["log.keyword"],
"_source": {
"@timestamp": "2024-10-24T17:39:45.771Z",
"log": "2024-10-24T17:39:45Z\tINFO\tCreating a new SeataServer Service {default:seata-server-cluster}\t{\"controller\": \"seataserver\", \"controllerGroup\": \"operator.seata.apache.org\", \"controllerKind\": \"SeataServer\", \"SeataServer\": {\"name\":\"example-seataserver\",\"namespace\":\"default\"}, \"namespace\": \"default\", \"name\": \"example-seataserver\", \"reconcileID\": \"5912d1c4-6afd-4d66-8f11-eea6c54a1e4c\"}\n",
"stream": "stderr",
"time": "2024-10-24T17:39:45.771071Z",
"kubernetes": {
"pod_name": "seata-k8s-controller-manager-6448b86796-6l46n",
"namespace_name": "default",
"pod_id": "966edd0e-bc15-4276-9e6a-e255e84859ce",
"labels": {
"app": "seata-k8s-controller-manager",
"pod-template-hash": "6448b86796"
},
"host": "minikube",
"container_name": "seata-k8s-controller-manager",
"docker_id": "b87df4627de30b0aab402aef4621fa46f45b3a1976dd6f466ab4a42bb8265455",
"container_hash": "bearslyricattack/seata-controller@sha256:84ddedd9fa63c4a3ab8aa3a5017065014826dc3a9cac8c8fff328fbf9c600f11",
"container_image": "bearslyricattack/seata-controller:latest"
}
}
}
]
}
}
We only need the logs related to the log field, so you can set index to log.
Arguments
label: Specify the query entries in the format{key1=value1, key2=value2, ...}, wherekeyis the name of the index in ES andvalueis the index's value. Neither the key nor the value requires quotation marks in the query.The default value is{}.number: The number of log entries returned, with a default value of 10.
Note: To accommodate different ES index structures, a preliminary index structure check will be conducted during log queries. If the index does not contain this structure, the query will not proceed and an error will be returned.
Loki
seata-ctl
log --label={job="seata-transaction"} --start=2025-10-18-14:21:21 --end=2025-10-18-22:16:14 --number=3Before using Loki, you also need to configure it in the configuration file.
    - name: "loki"  //loki name
      types: "Loki" //type name
      address: "http://localhost:3100"  //loki address
      source: ""
      username: ""
      password: ""
Arguments
query: The label for the query, following the native format, e.g.,
{job="seata-transaction"}, depending on the overall log format created.start: Start time in UTC timezone, formatted as
2024-10-18-12:32:54.end: End time in UTC timezone, formatted as
2024-10-18-12:32:54.number: The number of log entries returned.
Local
seata-ctl
log --level=INFO --number=5Similarly, to meet more diverse needs, we have developed a custom logging system for Seata applications on Kubernetes. This system will continue to evolve along with the Seata-K8s project.
At first,configure it in the configuration file.
    - name: "local" //name
      types: "Local"  //type
      address: "http://localhost:8080"  //address
      source: "seata" //application
      username: ""
      password: ""
      index: ""
Example
ElasticSearch
If everything is functioning correctly, the specified log entries will be returned.
log --label={stream=stderr} --number=3
INFO[0015] 2024-10-24T17:39:45Z INFO Creating a new SeataServer Service {default:seata-server-cluster} {"controller": "seataserver", "controllerGroup": "operator.seata.apache.org", "controllerKind": "SeataServer", "SeataServer": {"name":"example-seataserver","namespace":"default"}, "namespace": "default", "name": "example-seataserver", "reconcileID": "5912d1c4-6afd-4d66-8f11-eea6c54a1e4c"}
INFO[0015] 2024-10-24T17:39:45Z INFO Creating a new SeataServer StatefulSet {default:example-seataserver} {"controller": "seataserver", "controllerGroup": "operator.seata.apache.org", "controllerKind": "SeataServer", "SeataServer": {"name":"example-seataserver","namespace":"default"}, "namespace": "default", "name": "example-seataserver", "reconcileID": "5912d1c4-6afd-4d66-8f11-eea6c54a1e4c"}
INFO[0015] 2024-10-24T17:39:45Z INFO SeataServer(default/example-seataserver) has not been synchronized yet, requeue in 10 seconds {"controller": "seataserver", "controllerGroup": "operator.seata.apache.org", "controllerKind": "SeataServer", "SeataServer": {"name":"example-seataserver","namespace":"default"}, "namespace": "default", "name": "example-seataserver", "reconcileID": "5912d1c4-6afd-4d66-8f11-eea6c54a1e4c"} If the index does not exist, an error message will be displayed.
log --label={stream1111=stderr} --number=3
ERRO[0001] get log error: invalid index key: stream1111 If no documents are found, an error indicating "no results found" will be returned.
log --label={stream=stderr11} --number=3
ERRO[0060] get log error: no documents found If any other errors occur, an error message will be displayed.
Loki
If everything is functioning correctly, the specified log entries will be returned.
log --label={job="seata-transaction"} --start=2024-10-18-14:21:21 --end=2024-10-18-22:16:14 --number=2
INFO[0098] 2023-10-17 14:15:23.363 INFO [TransactionManager] --- Transaction [XID: 172.16.20.1:8091:123456789] ends with SUCCESS.
INFO[0098] 2023-10-17 14:15:23.360 INFO [RMHandler] --- Transaction resource committed successfully: ResourceId: jdbc:mysql://localhost:3306/seata_test, XID: 172.16.20.1:8091:123456789 If no documents are found, an error indicating "no results found" will be returned.
log --label={job="seata-transaction"} --start=2025-10-18-14:21:21 --end=2025-10-18-22:16:14 --number=3
ERRO[0058] get log error: loki query returned no results If any other errors occur, an error message will be displayed.
Local
If everything is functioning correctly, the specified log entries will be returned.
log --level=INFO --number=5
Peer example-seataserver-2.seata-server-cluster:9091 is connected
Peer example-seataserver-1.seata-server-cluster:9091 is connected
Node <default/example-seataserver-0.seata-server-cluster:9091> term 4 start preVote.
Peer example-seataserver-2.seata-server-cluster:9091 is connected
Peer example-seataserver-1.seata-server-cluster:9091 is connectedIf any other errors occur, an error message will be displayed.
2.2.4 结项文档
项目开发完成后,需要在ospp网站上提交一个结项文档,这个文档有一定的格式。
把之前的过程按照文档格式化就好。
项目信息
项目名称
与 Kubernetes 进行集成增强 seata-ctl 的运维能力
方案描述
项目大致可以分为三部分:
1.实现seata-server的运维功能。
2.对接prometheus,seata-server运维数据
3.实现seata-server日志诊断分析
为了实现这些功能,还需要一个全局配置文件以及对应的命令操作,下面分别介绍他们。
全局配置文件
用于为用户配置各种地址,配置文件,模式之用。通过命令初始化与读取参数。
设立与kubeconfig类似的context机制,让用户可以方便的使用一个配置文件同时运维多个集群。
配置文件结构如下:
Kubernetes:
    cluster:
        name:
        kubeconfigpath:
        ymlpath:
    ....
Prometheus:
    server:
        name:
        address:
        auth:
    ....
Log:
    cluster:
        name:
        collection:
            enable:
            loacl:
        analysis:
            enable:
            local:
        display:
            type:
            path:
            local:
    ....
Context:
    Kubernetes:
    Prometheus:
    Log:
seata-server运维
整体上实现用户通过简单的命令行输入实现快速在Kubernetes上部署Seata-server的功能。
工作流程为:用户输入命令之后,cli访问集群创建CR资源,再由部署在集群内的controller创建seata-server.
根据其对应的配置文件的复杂程度,将命令分为两部分:简单命令与复杂命令。
简单命令主要包括部署controller部署与删除,cr的创建与删除等。这部分相对比较简单和成熟,可以通过client-go中应用广泛的相关方法来解决。
复杂命令主要包括crd的部署与cr的部署,由于涉及到的结构过于复杂,使用unstructured.Unstructured结构体无法满足需求并且会出现decode失败等诸多问题,故使用从kubeconfig中拿到相关信息,绕过client-go库,直接组装原生https请求向api-server发送的方式进行创建。
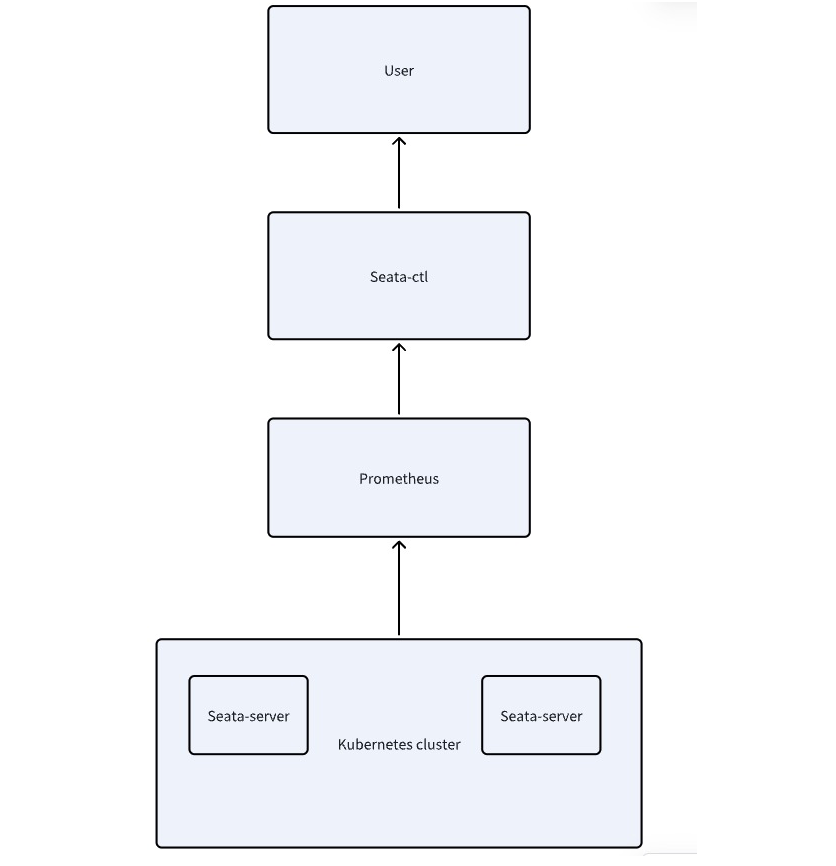
对接prometheus
整体上实现能从prometheus上获取mertics数据并展示。
实现方案为:在配置文件中配置prometheus地址,组装http请求,获取数据之后重新整理数据,使用asciigraph库充当GUI,做用户友好的数据展示。
系统交互示意图如下:
日志诊断分析
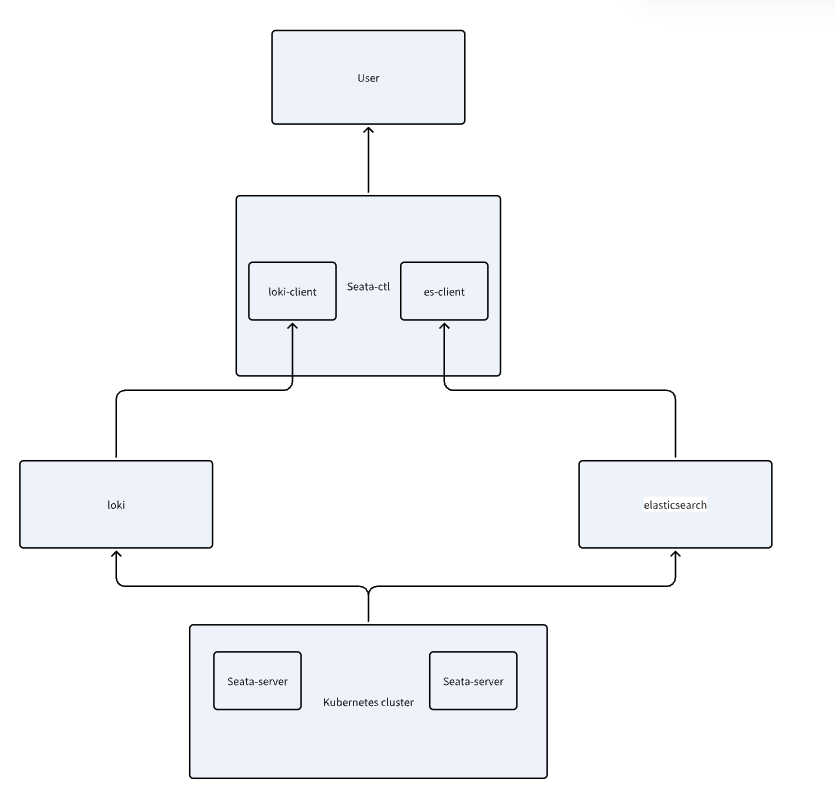
整体上实现获取日志收集工具的日志,并根据用户查询展示。
使用类似go-micro的代码插装思路设计,分别为这三个功能建立server,并通过接口的方式实现互相的交互。用户可以自由的选择是否需要该层的功能,并选择每一层采用什么方式实现。
最终实现在支持es的基础上,进一步支持市面上流行的prometheus/loki日志收集系统。同时自研一套日志收集与分析系统。
系统交互如图:
使用一个通用接口对接三个平台:
QueryLogs(filter map[string]interface{}) ([]string, error)由于每个平台的入参与返回值结构体不同,因此设计了以下结构:
入参分为两部分 一部分为公共配置 由yaml输入 一部分为命令行输入.
初始化client的时候会根据类型选择不同的参数,获取对应的参数后,统一编写代码转换成符合接口的类型返回,这样可以把拓展性提到最高。
注入和解析参数部分代码结构如下:
case "Loki":
		{
			param["Loki"] = impl.LokiParams{
				Expression: Expression,
			}
			return &impl.Loki{}, nil, nil
}
解析:
case "Loki":
		{
			param["Loki"] = impl.LokiParams{
				Expression: Expression,
			}
			return &impl.Loki{}, nil, nil
}
自研日志系统
日志收集系统主要有三种常见的部署模式:Node 模式、Sidecar 模式 和 Agentless 模式。
因为Sidecar 模式存在性能问题,最后自研日志系统采用node模式收集日志。
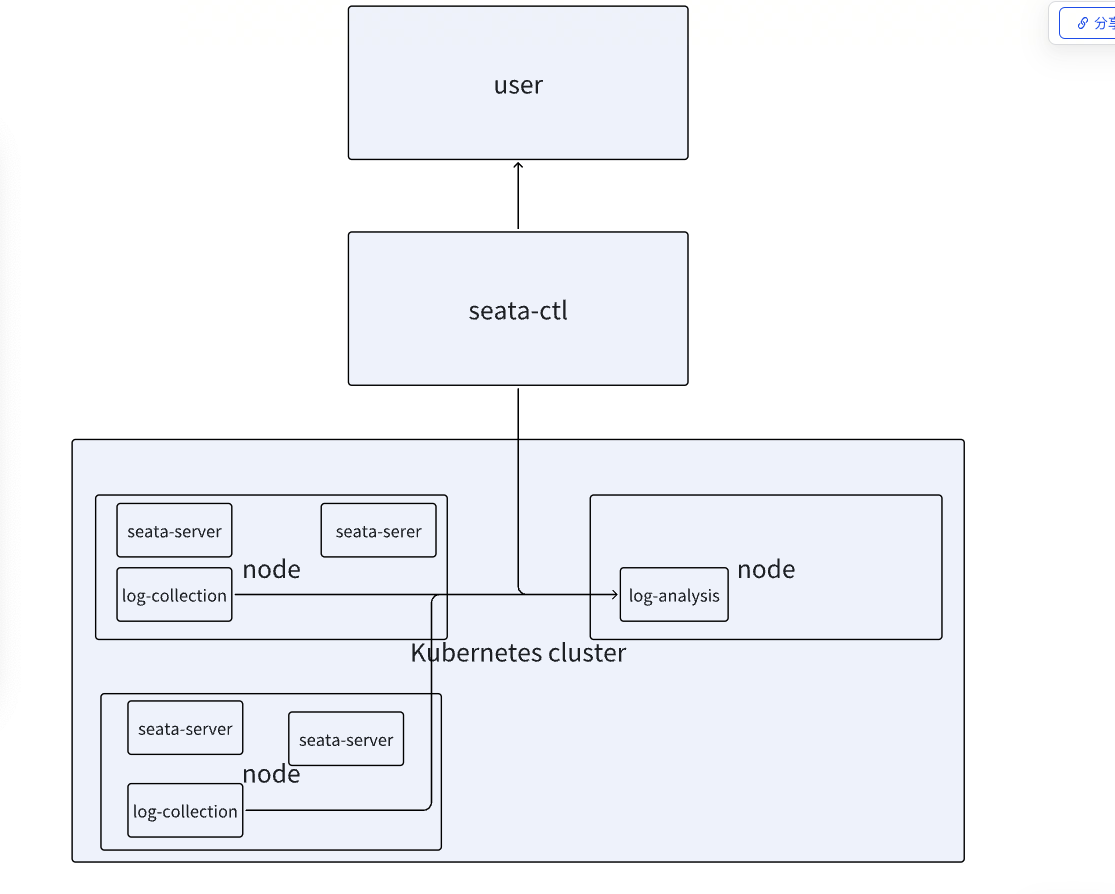
一共有两个组件:log-collection,log-anysilys.同ctl中集成一个client。
log-collection为日志收集器,主要以node的方式部署日志,本质上是一个gin-server,提
供一个接口,将文件目录下的日志以流式的方式返回。部署时,以
damenset的方式将其部署在node上,同时使用pvc挂载到seata的日志目录下。由于seata的日志是按天存入的,所以传入日志的目录即可正确的读入日志。
log-anysilys为日志存储器,主要以定时任务的方式获取日志收集器的日志,整合后存到自己的文件系统下。并提供一个接口给client,使其可以从这一个server获取到所有node的日志。
各个组件之间的交互如图:
时间规划
6.4-6.26 根据设计完善细节,包括各种命令细节的完善,三个server具体交互的接口的格式设计等,并整理成完整的文档。
6.26-8.20 进行项目代码的开发,并继续交流可能遇到的问题,目前看来该题目的代码工程量应该会特别大(主要来源于三个server的开发),开发期间协商周期进行测试并提交pr。并在开发过程中编写单元测试方法。(该设计天然适配go-mock测试框架,有利于单元测试)。
8.20-9.10 进行整体全流程的测试,修改可能存在的问题,优化测试用例,尝试进行性能测试优化性能,并撰写完整的文档,
9.10-9.31 继续修复bug与完善文档,如果有可能的话尝试参与社区的其他工作。
项目进度
已完成工作
全局配置文件
已完成,实现正确初始化与读取配置文件,测试完成。
seata-server运维
已完成,实现crd与controller的部署与删除,seata-server cr的部署与删除,查看seata状态的相关命令,在kubernetes集群上测试完毕,为可用状态,代码格式优化完成。
对接prometheus
已完成,实现查询prometheus中的指标并做用户友好输出。
输出效果如图:

已在minkube+本地prometheus测试环境中完成测试,为可用状态,代码格式优化完成。
日志诊断分析
对接es/loki部分代码编写完成,已完成部分测试,全部测试未完成。
代码格式优化未完成
自研日志系统
两个组件代码初步开发完成,功能可用,全部测试与代码优化未完成。
遇到的问题与解决方案
全局配置文件的部分设计和实现未遇到明显问题。
在seata-server运维部分,遇到最大的问题是k8s官方提供的dynamic-client和unstructured.Unstructured结构体功能不够,无法实现复杂crd的部署。由于字段过多,又没有工具可以验证,只能一个字段一个字段的对应,但是仍然有部分字段无法对应。
调用官方提供的一步到位的unmarsal方法仍然无法成功。后来有考虑过使用系统的kubectl命令实现,但是考虑到可能有的用户使用seata-ctl运维的时候,本机上并没有安装kubectl(虽然这种可能性很小),故抛弃了这种设计。
最终转变思路,去阅读kubectl apply命令的源码,进而获得灵感,可以绕过官方的client库,直接自己组装请求向api-server发送,从而绕过两次反复的结构体映射与转换,只使用一次简单的yaml-json的转换即可实现功能。
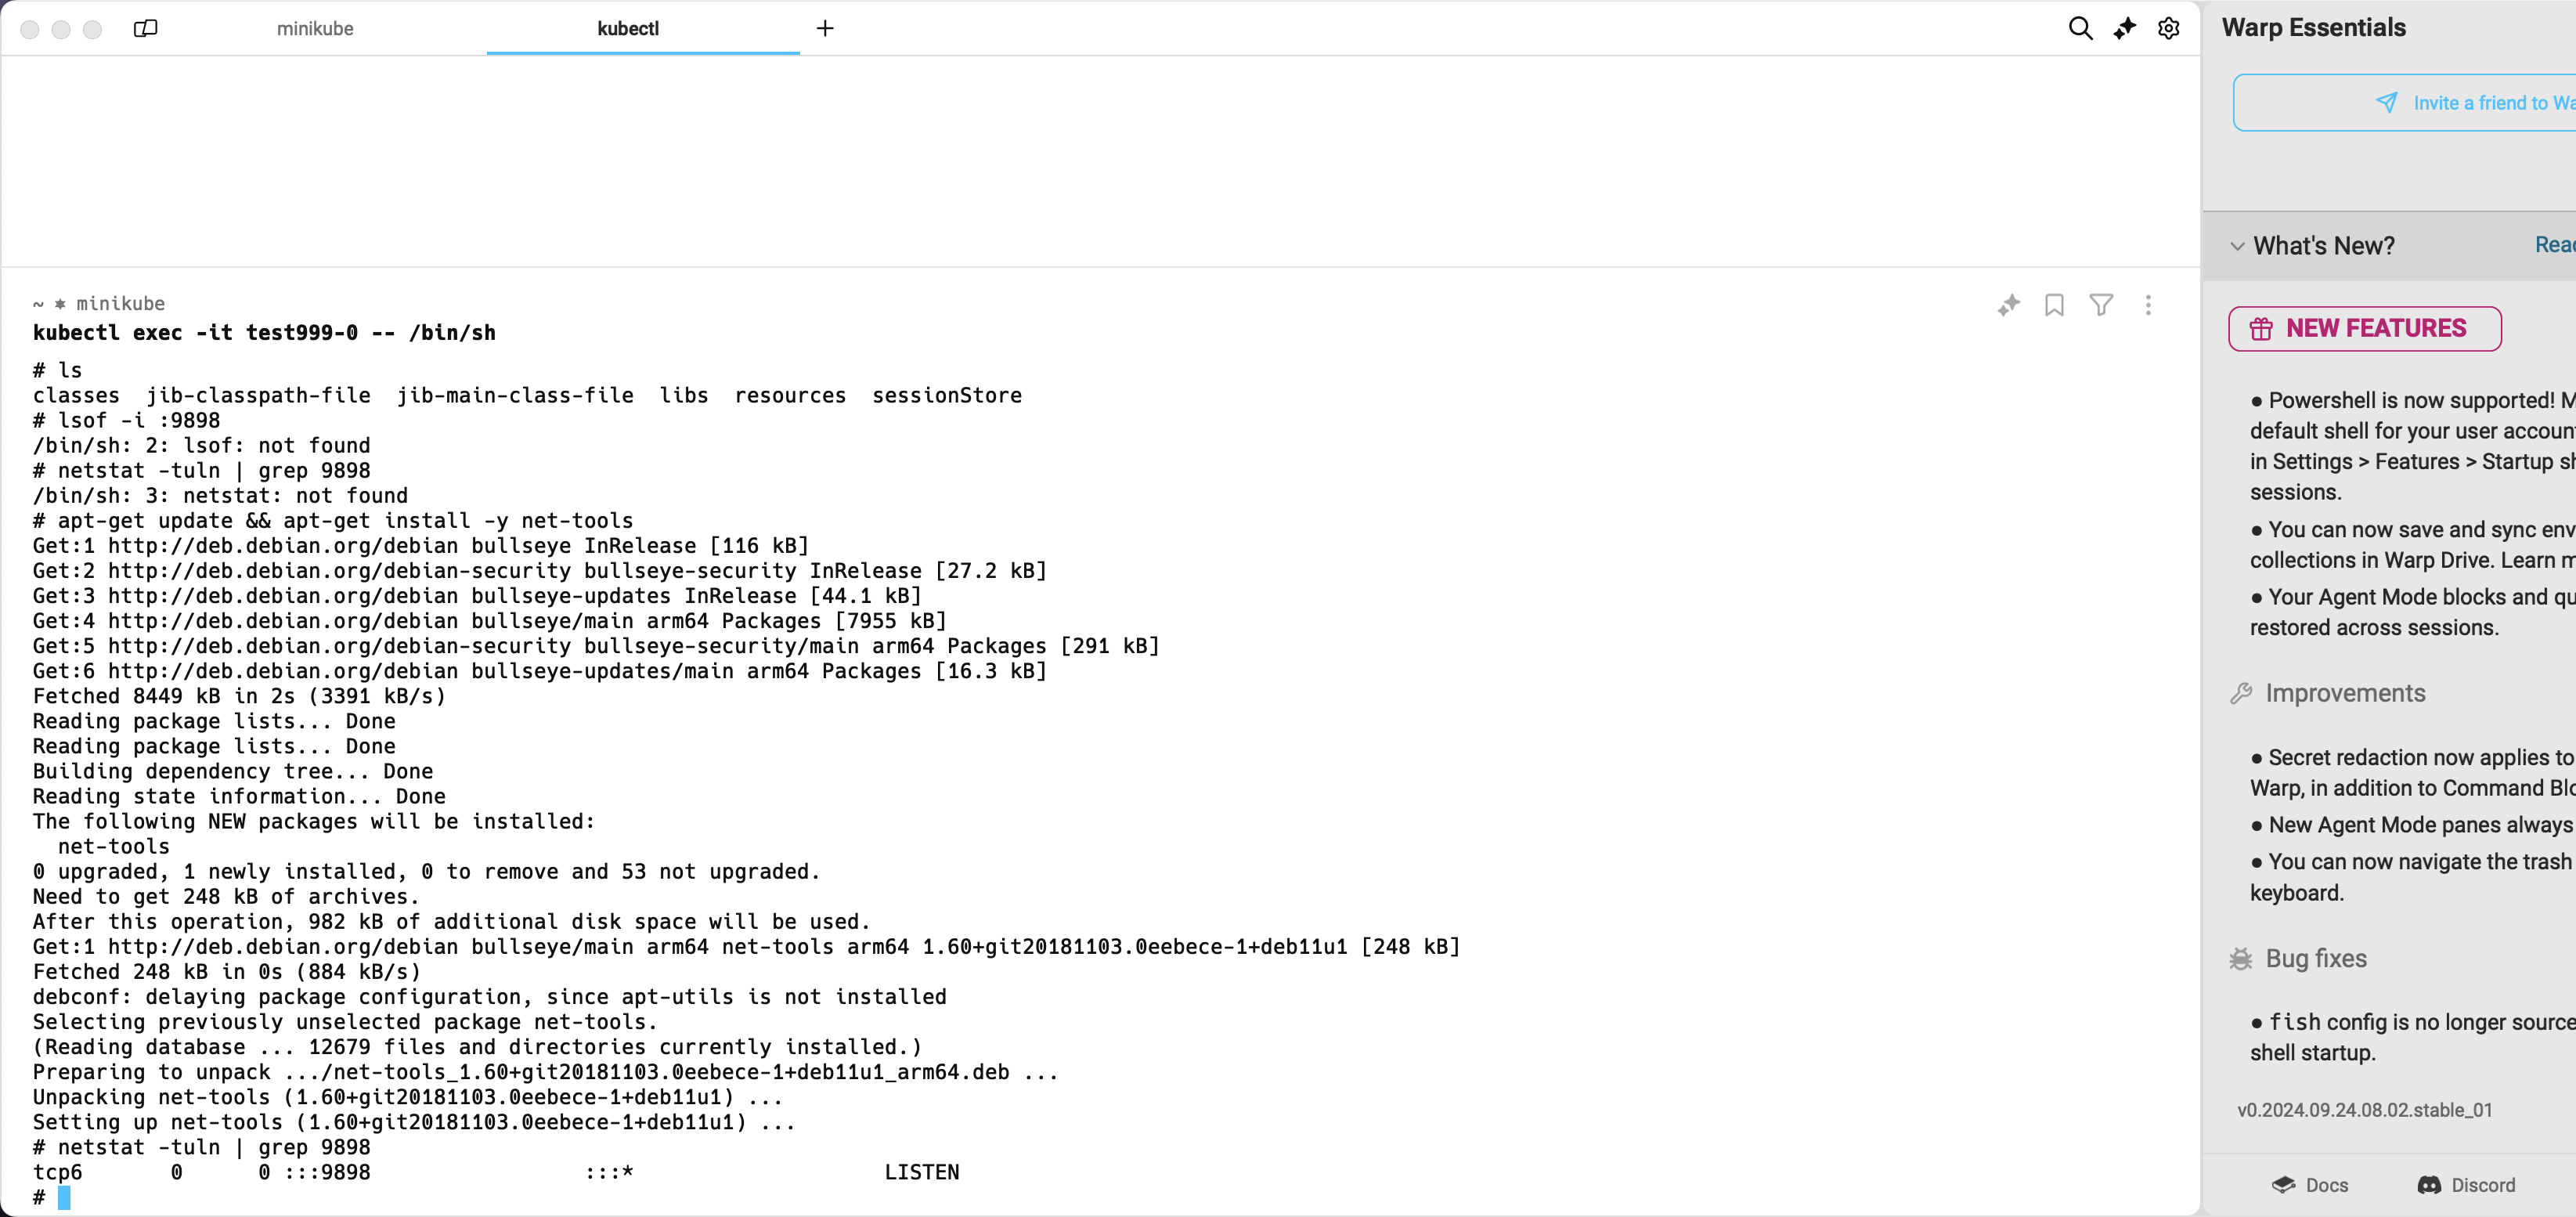
在prometheus部分,遇到的主要问题是不知道怎么部署一个开启mertics的seata-server,因为该项配置是默认关闭的,而当前最新版本的镜像又不支持开启。
解决方案是一开始使用mock的数据向prometheus发送,并验证client的功能,后续与导师交流,发现seata-server可以通过env映射到配置文件中,从而开启mertices配置。
  seataServer = &unstructured.Unstructured{
    Object: map[string]interface{}{
      "apiVersion": "operator.seata.apache.org/v1alpha1",
      "kind":       "SeataServer",
      "metadata": map[string]interface{}{
        "name":      Name,
        "namespace": Namespace,
      },
      "spec": map[string]interface{}{
        "serviceName": Name,
        "replicas":    Replicas,
        "image":       Image,
        "store": map[string]interface{}{
          "resources": map[string]interface{}{
            "requests": map[string]interface{}{
              "storage": RequestStorage,
            },
            "limits": map[string]interface{}{
              "storage": LimitStorage,
            },
          },
        },
        "metrics": map[string]interface{}{
          "enabled":                true,
          "registryType":           Metrics,
          "exporterList":           Metrics,
          "exporterPrometheusPort": MetricsPort,
        },
      },
    },
  }
从而成功开启。验证效果如图:
而对于日志系统,主要难点还是在设计上。怎么让其既要满足需求,又要提供尽可能高的拓展性,还要让用户输入的命令尽可能的少和不重复。
最终设计了接口抽象层,两级配置来源与自动识别类型验证机制等方式解决。
自研日志系统同样是一个很大的挑战,要实现功能相对比较容易,但是日志数据量很大,其分片,索引,持久化,等等要是想在生产维度上可用需要很高的性能,后续仍需要大量的优化。
后续工作安排
提交报告后,后续的工作安排如下:
1.完善第三部分-日志系统的测试和代码优化
2.定期向社区和导师汇报,根据导师和修改各个部分的pr.
3.优化自研日志系统的性能和可拓展性。使其达到生产可用状态。
2.2.5 导师评语
提交结项文档之后,这个可以在网站上找到。
- 评审结果- 代码 PR/MR 合并:完成
- 项目完成度: 项目整体完成度较高,主要功能模块均已实现,包括seata-server运维、Prometheus对接和日志诊断分析。其中,seata-server运维和Prometheus对接部分功能完善,测试通过,已达到可用状态。日志诊断分析部分已完成部分测试,自研日志系统初步开发完成,但仍需进一步完善和优化。
- 学生参与度: 学生积极参与项目开发并参与双周会,与导师和社区成员保持良好沟通,平均每周2-3次线上沟通,及时反馈问题并寻求解决方案。学生能够独立思考,并提出改进建议,展现出较强的学习能力和解决问题的能力。
- 代码贡献量: 学生提交大量的代码,涵盖了项目的主要功能模块,代码质量较高,符合开源社区的开发规范。学生还编写了单元测试,并使用了go-mock测试框架,体现了良好的测试意识。
- 综合评价及建议:
    - 项目目标明确,设计方案合理,技术路线清晰。
    - 学生参与度高,代码贡献量大,代码质量较高。
    - 项目整体完成度较高,主要功能模块已实现,但仍需进一步完善和优化,例如日志诊断分析部分的测试和代码优化,以及自研日志系统的性能和可扩展性优化。
    - 建议学生继续完善项目,并根据社区反馈进行改进,争取将项目应用到实际生产环境中。
- 最终评审结果:通过
然后就坐等审批就OK了。
整体的开发情况就是这样。总的来说难度还是很大的。希望能对参加OSPP的同学提供一点帮助。

